Summer gardens are a joy but building sun-blocking structures of shade cloth and framing can be a chore.
Today I will describe a shade structure that is easy to install and dismantle, made of parts you can buy locally, and fits over narrow garden beds of any length.
And most importantly, there are no plastic or metal clips required to attach the shade cloth to the frame.
This design has only two essential components and maybe a third if you have long beds. If you can weed your garden then you can build this shade structure!
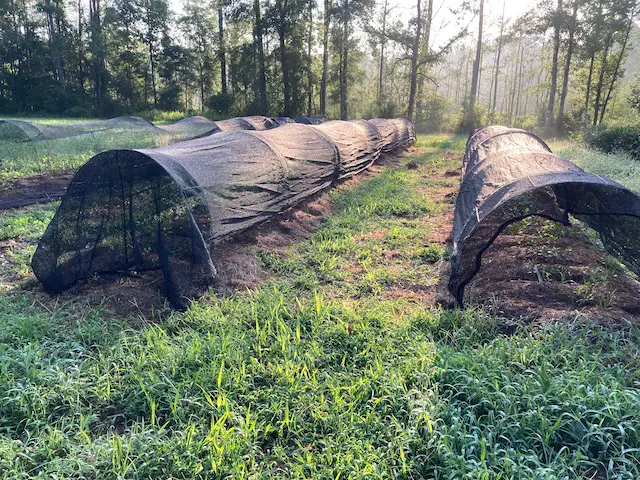
Table of Contents
- All You Need to Make a No-Clip Shade Cloth Structure
- How to Attach Shade Cloth to Metal Frame (Without Clips)
- How to Make Shade Hoops
- How to Install Shade Cloth
- How to Buy and Adjust Shade Hoops
- How to Choose Shade Cloth
- How to Maintain Your Shade Structure
- Summary: Benefits of the No-Clip Shade Structure
- How to Repair Shade Cloth
- How to Join Shade Cloth Together
All You Need to Make a No-Clip Shade Cloth Structure
Here’s the materials list:
- Shade cloth with any level of light transmission,
- Masonry reinforcement ladders for hoop frame,
- Cordage and tie-down stakes (optional).
The key innovation here is that the shade cloth is secured entirely with pairs of masonry ladders which you arch over beds to form hoops.
I have named this clipless shade hoop design the Holley Hoop because it was developed by my friend and farming neighbor, Herman Holley.
With this setup, you can plant vegetables, flowers, or perennials and then cover them temporarily or long-term with a shade cloth.
How to Attach Shade Cloth to Metal Frame (Without Clips)
Farmer Herman’s insight was that using detachable clips to fasten shade material directly to a metal frame was doomed to fail.
The reason is that the cloth at the clip attachment is under stress from the wind or gardeners working on the shaded bed. Over time, the cloth will tear at the clips and you’ll end up with a lot of holes to repair.
Worse still, you have to remove clips to pull up the shade cloth and then, to your annoyance, try to not lose the clips!
Instead of attaching the shade cloth to the frame, reasoned Farmer Herman, why not sandwich the cloth between two masonry ladders cut to length? This way, the stress is distributed over a wider area of fabric resulting in less abrasion and fewer rips.
And with a shade-cloth sandwich, there’s nothing to unclip from the frame. Just pull up the cloth from the base of the frame and you can tend the bed.
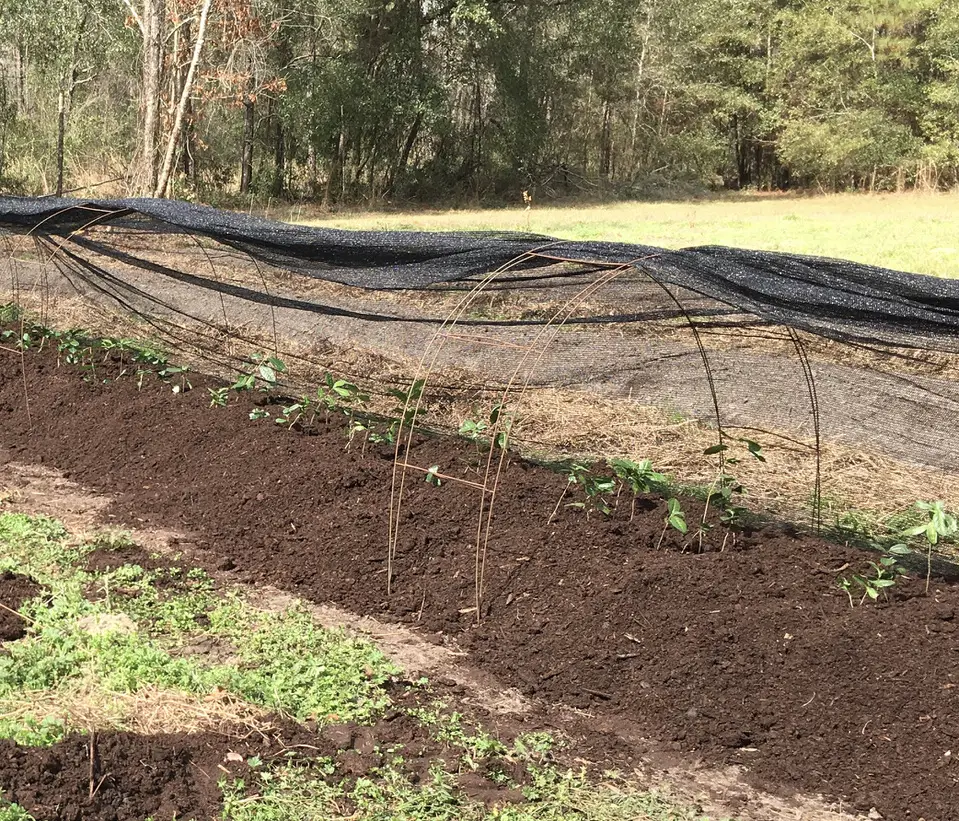
How to Make Shade Hoops
Masonry ladders are widely used in construction projects to reinforce the mortar between courses of bricks or cement blocks.
To convert a pair of masonry ladders into Holley Hoops, stand on one edge of your garden bed and hold a ladder so that the two tines on one end are parallel to the bed.
Using your foot, press down on the rung of wire closest to the ground and push the tines into the earth. Only go down as far as the first rung.
Next, lay the ladder across the bed while flexing the center of the ladder away from the bed. Then stick the other two tines into the earth on the opposing edge of the bed.
The first ladder is now the inner hoop of the pair.
Repeat this procedure with a second ladder inserted just outside of the inner hoop. Get as tight to the inner hoop as possible but don’t cross the tines over the inner rung.
With the second ladder secure in the ground, release it to fall on the inner hoop. Do not insert the tines into the ground on the opposite side; instead, just leave the end of the outer hoop to hang unsecured for the time being.
Now you have the outer hoop laying on the inner hoop, like two slices of bread awaiting a filling between.
How to Install Shade Cloth
Continue to install pairs of hoops along the length of the bed with about three normal paces, or about 10 feet, between pairs.
To make the next step easier, be consistent on which side of the bed you insert the tines of the outer hoop.
Fill the Hoop Sandwich
Now to add the filling to the hoop sandwich, unroll your shade cloth along the entire length of the bed and outside of the paired hoops.
Be sure to unroll on the side where you left the tines of the outer hoops suspended above the ground.
Standing at a pair of hoops on one end of the bed, take an edge of the cloth and slip it up and between the two hoops. Continue pulling the cloth between the hoops until you reach the opposite side, near the ground.
It’s good to have about 4 to 5 feet of cloth overhang here on the end.
Make sure the trailing edge of the fabric is out of the way and then insert the final two tines into the ground as before. Never insert hoop tines through the cloth!
Now your cloth is tightly sandwiched between the pair of end hoops and you can continue the same installation procedure along the rest of the bed.
Take the slack out of the cloth as you work your way from one pair of hoops to the next.
Finish the Hoop Sandwich with Tie Downs
When you reach the last pair of hoops, finish the sandwich like all the others.
On beds over 50 feet, I like to tie down the inner hoops on each end of the bed to a stake. With the ends secured, the shade cloth doesn’t sag in the middle of the structure.
With all the shade cloth sandwiched up, congratulations are in order because you’ve just made your first Holley Hoop Shade Structure!
How to Buy and Adjust Shade Hoops
Mansory ladders are usually sold in 10-foot lengths, so to make Holley Hoops, you have to make just one choice: the width of the ladders.
I prefer ladders that are 10 inches wide for the inner hoop and 8 or 6 inches wide for the outer hoop. Two hoops of unequal width sandwich the fabric together more securely than two hoops of the same width.
But if all you have are ladders of the same width, don’t worry about it. Your Holley Hoops will be plenty strong.
I also prefer galvanized ladders over ungalvanized ones because the former has a smoother finish and resists corrosion.
For an ordinary 50-foot garden bed, I use a pair of ladders about every 10 feet of bed length, with a pair for each end. Add up what you need and then head to your big box store or masonry supplier.
Ladders are sold in bundles of 20 or more, and if you buy more than you need for shade, repurpose the remainder for other garden needs such as a trellis for vining plants.
To make shorter hoops for narrower beds, trim the ladders to length with bolt cutters or heavy-duty wire cutters.
How to Choose Shade Cloth
To get the most out of my investment in shade cloth, I have settled upon materials constructed with the following characteristics:
Min 30%, Max 50% light transmission. Studies show that many herbs and vegetables increase performance under modest amounts of shade. I go with 50% shade for my tea seedlings because they were sprouted in deep shade and need time to lay down strong roots. Vegetables such as peppers do better at 30%.
Use dark shade fabric. Black and dark-green shade cloth reflect less light than lighter colors and are therefore easier on the eyes. Little things like this matter when you’re out there working all day.
Choose weaves that don’t unravel. When you get holes in your shade fabric, lock-stitching and the like prevent cuts from unraveling the entire length of the material. You may also want to cut cloth to specific dimensions and only lock-stitched fabric will resist falling apart. If not specified, ask the seller what the stitching is like.
Width of the fabric is 6 to 8 feet. I deploy 6-foot-wide shade fabric on my Holley Hoops but you can use 8-foot if you want to completely enclose your garden bed from one side to the other. Material wider than 8 is probably wasted in this application.
Plan first then buy in bulk. Estimate your needs by adding up the total lengths of your garden beds, with each bed getting an extra 4 feet of overhang at the two ends. For example, a 50-foot bed needs about 58 feet of shade cloth. You can then get huge discounts, sometimes as much as 40%, if buy you all of your shade cloth in bulk and then cut cloth to length as needed.
Don’t go cheap. If you want your shade materials to last for many years, then spend a little more on quality cloth. And keep in mind, if you change your focus away from gardening, you can always resell the material second-hand. It’ll get snatched up by other growers in no time!
How to Maintain Your Shade Structure
During an ordinary growing season, shade cloth will sag between the hoops and drape on the plants underneath.
To snug up everything, first, walk along the bed and pull up the tines of the outer hoops along one side of the bed. Don’t pull up the tines on the pair of hoops on the bed end where you started. Leave the end cloth sandwiched for now.
At the other end of the bed, gently pull the shade cloth towards you to tighten it up. While holding tension on the cloth, reach down and push the hoop tines back in the ground to sandwich the end hoops down on the cloth.
Then work your way back along the length of the structure, tugging and sandwiching as you go.
Summary: Benefits of the No-Clip Shade Structure
I hope I have convinced you that the Holley Hoop design is worth installing in your own garden.
To bring it all together, let’s summarize the benefits of this innovation.
- Durability. Dismantle and store your hoops under shelter and off the ground and they will last for 15 years or longer. Store shade cloth out of the elements and it will remain intact for well over a decade.
- Portability. Working alone, I can dismantle and reinstall a 55-foot Holley Hoop structure in about twenty minutes, and in less than half that if assisted.
- Modularity. To extend bed length, just add more pairs of Holley Hoops. For really long beds, meet two shorter pieces of shade cloth at the structure’s middle rather than sewing them together. Then install shade out and towards the ends.
- Adjustable hoop sizes. Short crops like lettuce don’t need a lot of headroom. Trim down your masonry ladders to an appropriate size and then dedicate the hoops and fitted shade cloth to crops based on their growth patterns.
- Multi-use. Masonry ladders can be repurposed; for example, as a trellis for supporting cucumbers and squash and as frames for staking out tomatoes.
- All-season use. I also use the Holley Hoops in the winter to support frost cloth and the principles of installation are exactly the same as with shade cloth.
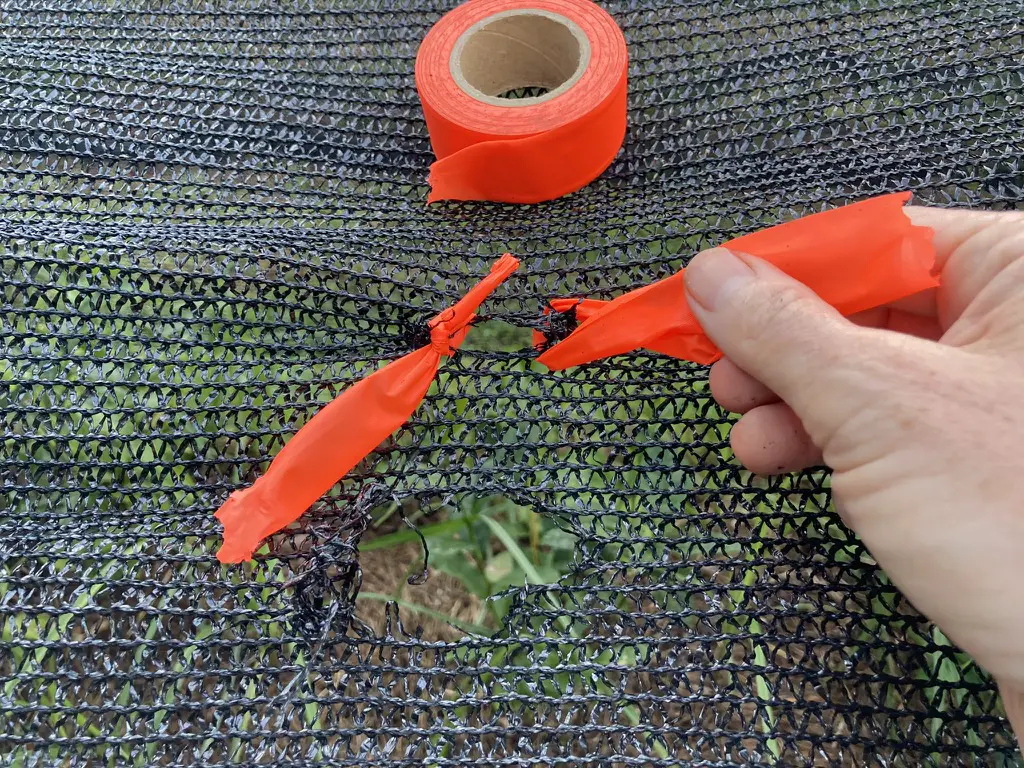
How to Repair Shade Cloth
As a quick but temporary patch to a rip, I sometimes use bailing twine made from either synthetic or natural fibers.
However, my favorite material is bright-orange survey flagging because it’s easy to twist and thread through the weave and it doesn’t have abrasive edges.
Also, it’s hard to ignore the eye-catching coloration of the tape which means I won’t overlook the hole when I have time for a thorough repair.
For a permanent fix to a hole, you’ll have to do a little sewing but it’s not hard.
Purchase some 9- or 12-ply lacing cord and a heavy needle. Make sure the cord is UV-stabilized so that it doesn’t degrade in the sun. This is a cheap kit, less than $10, and can often be purchased along with your shade cloth.
Start by threading a length of cord through the eye of the needle. Then work the needle through the cloth just past the spot you’re closing up.
Pull the cord through and gather two or three weaves of cloth together and tie a double overhand knot at that spot.
Now, pull the fabric together at the rip and start threading the cord through, back and forth, until you work your way past the hole by two or three stitches of fabric.
To finish off, tie another double knot around several stitches, cut the cord, and you’re good to go!
How to Join Shade Cloth Together
Sometimes you want to customize your shade structure with unique dimensions of cloth. For instance, you need a wider section of cloth than the factory produces.
In this case, you can sew together the long edges of two pieces using the same needle and cord described above for repairing holes. This time, however, use the smaller diameter cord, the 9-ply, to bind the pieces of shade cloth.
Try these steps for joining shade cloth together:
- You will be making a seam between two pieces so start by laying the cloth on the ground in front of you.
- Overlap the two edges about three weaves deep on each piece.
- Take your threaded needle and loop around the two outermost, or corner, stitches of the two edges.
- Pull the thread through and tie off a double knot.
- To construct the seam, start spiraling the cord over and under the two edges, working away from you.
- When you reach the opposite end, tie a knot into the corner just like you did initially.
- Cut the cord and you have your new, expanded piece of shade cloth.
Mike grows and crafts tea in North Florida, USA. He has advanced degrees in biology, and has undertaken coursework in manufacturing Camellia sinensis teas. Mike is a member of the US League of Tea Growers (USLTG) and has presented invited talks on tea growing. Send him a note through our Contact Page if you'd like to talk about tea.