Making black tea from Camellia sinensis is one of the great joys of growing your own tea.
And after all your dedication in the garden, you want homemade black tea that fills you with joy and is not merely good enough.
Today, I offer a detailed guide to processing tea leaves by hand into fantastic black tea.
I share tea-processing methods valuable for tea makers at all stages, from beginners to experts. I also highlight how North American tea makers can use ordinary resources in the home to make this special loose-leaf black tea.
And even if you’re not a tea maker, follow along because you’ll gain a deeper understanding of the art and science of producing fine tea.
This guide is lengthy because I tell you the secrets and leave nothing out. There’s no other tea-processing guide like this for free.
Let’s start with an overview of the procedures.
Table of Contents
- Making Black Tea at Home: A Quick Look
- Step 1: Harvest Camellia sinensis Tea Leaves for Black Tea
- Step 2: Withering of Tea Leaves for Black Tea
- Step 3: Hand-Roll Tea Leaves for Black Tea
- Step 4: Oxidation of Tea Leaves for Black Tea
- Step 5: Drying Tea Leaves for Black Tea
- How to Store Your Homemade Black Tea
- Summary: How to Make Black Tea at Home
- References
Making Black Tea at Home: A Quick Look
This recipe has five essential steps for processing tea leaves into black tea.
To succeed, you cannot skip steps or rearrange the order.
Here’s an outline with approximate times needed to complete tea processing:
- Harvest tea leaves. Usually in the afternoon and with attention paid to the type of leaves plucked, 30 min to 1 hour.
- Wither of tea leaves. Indoors under climate control with specific goals for the amount of leaf moisture lost: 12 to 14 hours overnight.
- Roll withered leaves. Manipulate leaves by hand to express tea juice and shape leaves; 1 hour of hard work, usually in the morning.
- Oxidize rolled leaves. Heat leaves in a climate-controlled chamber for 2 to 3 hours to enhance the oxidation of tea biochemicals.
- Drying of tea leaves. The final step: use a kitchen or countertop oven or a food dehydrator for at least one hour to remove nearly all leaf moisture. Drying outdoors in the sun is also an option.
Put the timeline together, and an average commitment to making black tea is from around 5 p.m. on the first day to around noon, or a little later, the following day.
Don’t worry; you won’t be monitoring the tea leaves every minute of that time. You will, however, need to pay attention to the changes that are taking place in the tea leaves.
And this, I guarantee, will be great fun!
Step 1: Harvest Camellia sinensis Tea Leaves for Black Tea
I will assume that you have access to a Camellia sinensis garden that provides freshly harvested tea leaves.
And in case you aren’t yet aware, all true teas, such as black, green, oolong, white, and pu’er, are made from leaves of C. sinensis. This remarkable plant has properties not found in herbal “tea” infusions, such as chamomile or mint.
When to Harvest Tea Leaves for Black Tea
In North America, you can harvest tea leaves for black tea at any point in the growing season when plants produce fresh, tender foliage.
However, the character of tea may change through the season. For example, early spring is good for black tea, but many tea makers prefer to reserve spring leaves for delicate teas like green or white.
In practical terms, small-scale growers and hobbyists won’t have the luxury of choosing among different seasons. Instead, focus on harvesting the proper types of tea leaves, and your tea will be great regardless of the season.
Best Tea Leaves to Harvest for Black Tea
Not all tea leaves are the same.
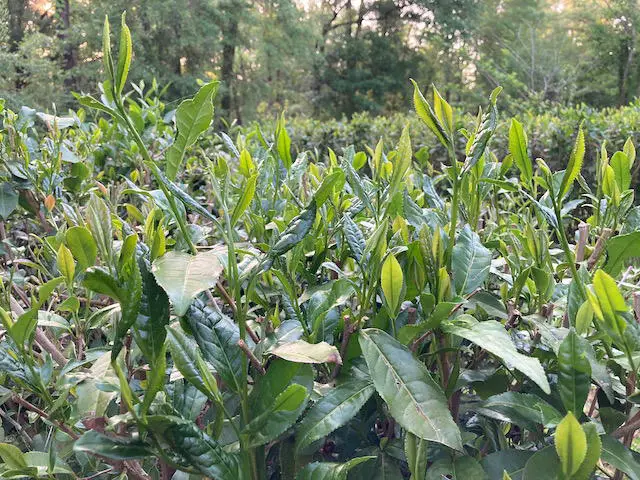
The main difference is between young leaves and old leaves. As a rule, the youngest leaves are at the tip end of a stem.
Tea leaves at the tip that haven’t yet matured are called buds.
The bud and the next nearest leaves down the stem have the highest concentrations of compounds, such as catechins and caffeine that play an essential role in the character of black tea.
The bud and the adjacent two leaves are supple and resist breakage when they’re twisted and rolled in step 3 of our methods.
Further down the stem from the bud, the leaves are older and less tender. Old leaves are harder to manipulate physically without shattering into stringy bits.
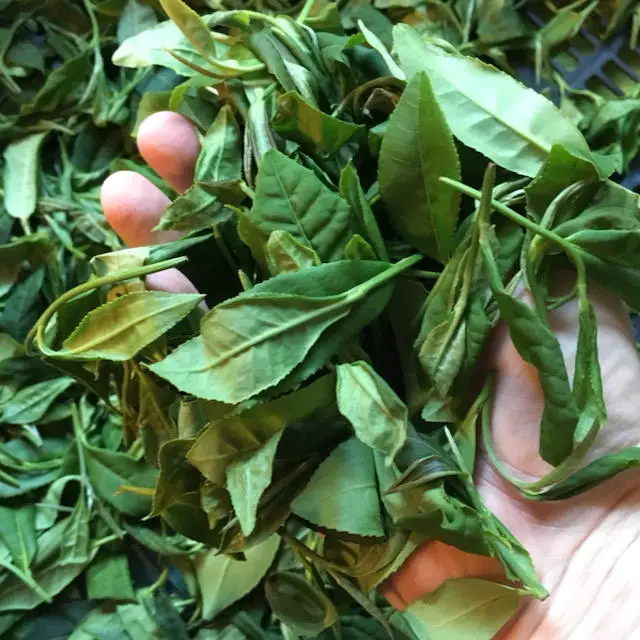
Your goal is to harvest the bud, stem, and next two leaves intact. This selection of foliage is the famous “two-leaves-and-a-bud” that you’ve heard glorified by tea aficionados.
You can also harvest the third leaf down from the bud, or “three-leaves-and-a-bud,” but only if it feels tender and pliable. Adding the third leaf with the stem can improve your black tea’s flavor and mouthfeel.
Just keep in mind that an older third leaf may be harder to roll by hand.

How to Harvest Tea Leaves for Black Tea
In your tea garden, notice the flexibility of the stem just below the bud. Also, note that flexibility decreases as your hand moves closer to where the stem connects to a main branch of the plant.
The older stem will feel wiry and stiff. The youngest stem is smooth, supple, and ready for a quick snap or pluck with your thumb, index, and middle fingers.
Make a two-and-a-bud plucking and compare the feel and sound of this pluck to a three-and-a-bud. The latter is a little harder to pluck, and you should avoid it altogether if the stem doesn’t snap when you use a modest amount of force.
Some tea pickers use handheld shears or scissors to cut the stem. If this is the only way to harvest tea leaves, continue doing so.
However, be mindful that a cut stem undergoes biochemical changes different from a plucked stem. It’s as if the tea plant knows the difference, and many tea makers believe that a plucked leaf makes a superior black tea.
To summarize, pluck either two-and-a-bud or three-and-a-bud or a mixture.
How Much Tea to Harvest for Black Tea
Since we are processing black tea by hand, there’s only so much tea—and only so little—that you can efficiently process.
The main limitation is during hand-rolling of the leaves, where a leaf pile that’s too big is about as manageable as a herd of cats.
My ideal amount of freshly harvested tea leaves weighs about one and a quarter pounds (one-half a kilogram), and I can comfortably handle as little as half a pound (a quarter of a kilo) of fresh leaves. Any less than this amount is awkward to roll.
With experience, you’ll discover how much tea leaf you can efficiently process by hand but aim to harvest three-quarters to one-and-a-quarter pounds of fresh leaves. A lot will depend on the strength of your hands and wrists during rolling.
And don’t quit just because you have small yields. I’ll explain a few tricks later on for handling harvests that are on the light side.
How to Collect Tea Leaves While You Pluck
As you pluck, collect the leaves in a container that doesn’t trap much heat. You may be plucking when it’s hot out and don’t want the leaves to overheat and die.
I use a lightweight basket of woven wicker that is deeper than wide. With a cord passed around the basket’s rim, I have a convenient container to hang from my neck, leaving both hands free to pluck.
Be gentle with the tea leaves and try not to cause bruising, which will start enzymatic oxidation within the leaf. We want to save oxidation for later.
Weigh Leaves, Then Inhale
When you finish, immediately take your harvest into a cool, sheltered space and use a kitchen or handheld scale to weigh the leaves. The total weight of the fresh leaves is critical, so don’t skip this step. You’ll need this information later on.
Next, spread out the leaves on a clean tabletop or sheet and note the aroma of the leaves. Is it grassy and pungent? Use whatever description you find helpful and write that down.
And now you’re ready for the next step, withering.

Step 2: Withering of Tea Leaves for Black Tea
Freshly harvested leaves are about 80% moisture by weight.
The remaining 20% are solids that cannot be evaporated in a time frame relevant to making black tea.
Your goal during withering is to reduce the moisture content of the leaves to between 55 and 65%. Trial and error show this range of moisture content is ideal for making an excellent black tea.
The catch, however, is to wither for no more than 12 to 14 hours and in a space where the air temperature remains about 70℉ (21℃).
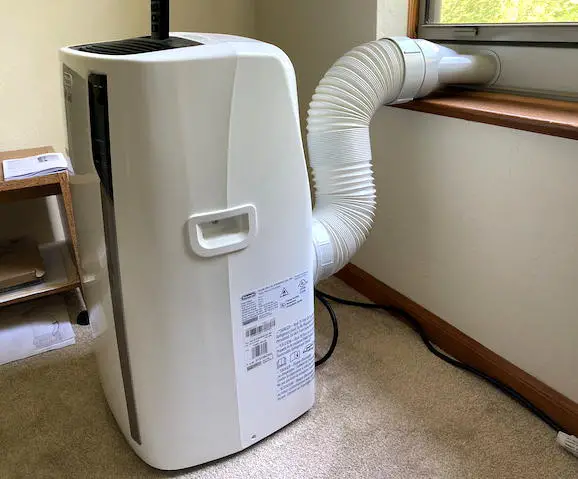
All you need is a climate-controlled space to wither leaves in, and many of you already have a home with air-conditioned rooms. And if not, try to follow the guidelines below anyway because good tea will still happen!
Why Wither Tea Leaves?
We wither leaves for black tea to:
- Make the leaves less breakable during rolling;
- Encourage plant cells to release chemical contents;
- Reduce grassy aromas in freshly harvested leaves; and
- Preserve enzymes and polyphenols needed during rolling and oxidation.
We won’t dive deep into the biochemical and physical explanations of these critical processes.
It’s enough to know that partially dehydrated plant cells resist breaking like a water balloon is tougher to burst when it’s half-full. We don’t want the cells to burst.
At the same time, moisture loss reshapes cell vacuoles and membranes and makes these structures more likely to leak their vital contents. Once leaked, the contents can mix and react to form distinctive black tea aromas and flavors.
Grassiness is characteristic of green tea but not black, so we need this aroma reduced in our withered tea leaves. Like a mowed lawn, the grassy aroma in tea is most intense a few minutes after plucking but dissipates in a few hours.
And finally, we don’t want to lose crucial enzymes and substrates that drive oxidation, so we’ll closely manage air temperature and the total time spent withering.
Where to Wither Tea Leaves
To properly wither tea leaves, consider cooling a small room in your house with either a portable air conditioner or one that mounts in a window.
In humid climates, the a/c unit may not remove enough moisture from the air. In this case, use a dehumidifier along with the a/c.
Every space is different, so you’ll have to experiment to find the settings for these two machines to create the best environment for withering tea leaves.
A thermometer to check air temperature and a hygrometer for humidity will help you make adjustments and be consistent between batches of tea.
And if you can’t budget for a portable a/c or dehumidifier, don’t fret. Use your home’s central air conditioner and wither leaves in your lowest-temperature space and monitor the environmental factors discussed here. Adjust what you can and enjoy the outcome.
How to Wither Tea Leaves for Black Tea
Water loss occurs when the air’s relative humidity (RH) is lower than the moisture percentage within leaf tissue.
To reduce leaf moisture to between 55 and 65% remaining, adjust the a/c and dehumidifier so that the room’s RH is in this same range.
You can lower the room’s RH even more, but be wary of tea leaves that turn brittle, indicating that superficial leaf tissues have desiccated before deeper layers have reshaped and lost moisture.
And you’ll know if your RH is too high when you can’t reduce leaf moisture to the desired range.
One final setting: adjust the a/c where the air temperature is stable at around 70℉, plus or minus a degree or two. This temperature range maintains enzymes such as polyphenol oxidase, which are vital during oxidation.
You may find it easier to keep a steady temperature than RH, but that’s how it is. Research the relationship between temperature and humidity, and you’ll be better able to troubleshoot climate-control issues.
Change the Thickness of the Leaf Pile
Another way to adjust the rate of water loss is by changing the shape of the heap of withering leaves. For example, a pile with a high peak will wither more slowly than a flat, uniform pile.
Lay your fresh leaves on a sheet, preferably spread atop an elevated surface like a table. Arrange your tea leaves into a square-shaped pile about two inches (5 cm) deep.
If the leaves are withering too slowly, then spread them more thinly, and if they’re withering too fast, pile them more deeply.
You can also increase the wither by moving air around the room with a fan set at a gentle speed.
Another option is to make a withering rack out of a fine mesh screen to improve air circulation around the leaves. Small blocks to elevate the tray a few inches above a tabletop can also help airflow.
How to Estimate the Percent of Moisture Remaining
If you weigh your tea leaves before they wither, you can easily find the percent moisture remaining in the leaves after that.
For example, let’s say you plucked 16 ounces total. If 80% of this total is water and other volatile compounds, you had (16 x 0.8) = 12.8 ounces of moisture at the start of the wither.
And suppose your goal is to reduce moisture to 60%. In this case, you want (16 x 0.6 ) = 9.6 ounces of moisture remaining in the tea leaves. In other words, you need to lose (12.8 – 9.6) = 3.2 ounces of the total weight, assuming all lost weight is water.
You check the total weight of leaves after 6 hours of wither and find that you’ve lost 2 ounces. The leaves need more time to wither, so you go to 12 hours and lose another ounce for 3 ounces lost in total. That’s close to the amount needed to reach 60% moisture remaining, so we can stop the wither in this example.
How Long to Wither Tea Leaves?
12 to 14 hours of total wither time is often best for homemade black tea. This timeframe is the optimum for losing grassy aromas without eliminating distinctive black tea flavors.
However, what do you do if your leaves have withered for 14 hours and aren’t in the optimum range for moisture content?
You can push the wither duration beyond 14 hours, but tea leaves will eventually sour from the build-up of lactic acid or the action of microbes.
I know tea drinkers who like the taste of sour tea. You just never know until you try.
In my view, I wouldn’t stress too much about getting the percent of moisture content in the 55 to 65% range every time. I’ve made black tea that finished withering with 70% moisture remaining, and it was pleasant to drink.
The range I recommend here is merely a guideline for your tea-making experiments. But try your best to follow the recipe, especially the first few times you process black tea.
Final Notes on Withering Tea Leaves
As your tea leaves wither, pay attention to changes in aromas. A sweet fruitiness like cut apples or pears will replace the green grassiness of the fresh leaves.
If these aromas are not what you detect, find a better description and be consistent between batches of tea.
You’ll also know that your tea leaves are nicely withered when they have floppy stems that resist breaking when twisted or bent. Note the condition of the leaves along with the aromas.
With experience, you will learn when the percent moisture remaining, the aromas, and the feel of the leaves are just right.
Then it’s time to move on to the rolling step.
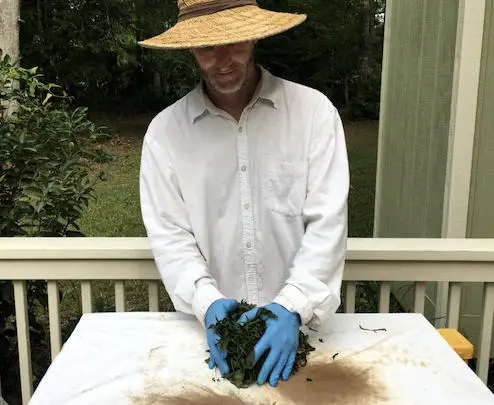
Step 3: Hand-Roll Tea Leaves for Black Tea
The goal of rolling tea leaves is straightforward. You want the enzymes, polyphenols, and aroma compounds inside leaf cells released and mixed on the exterior leaf surface.
In other words, you want to squeeze out or express “tea juice.” If juices are thoroughly combined, this is the stuff that works magic and makes your black tea worth drinking.
The challenge, however, is that you don’t want to crush and destroy the leaf’s cellular structure along the way. Shattering of cell walls and other structures causes the leaf to fall apart, and broken cells don’t release their tea juice properly.
And torn-up leaves don’t look nice either, so we’ll try to keep the leaves from breaking into pieces.
Fortunately, you withered the tea leaves, making them resistant to breakage.
Where to Roll Your Tea Leaves
You won’t necessarily need a cool, dry room to roll your leaves in as you did during the wither. Some tea makers even prefer to roll their leaves outdoors in the warm air.
I recommend, however, that you work indoors at a comfortable ambient temperature. So long as the air is within a few degrees of 75℉ (24℃), the tea enzymes are below the optimum temperature for catalysis.
And as you’ll see, it’s important to be comfortable rolling tea.
Materials for Rolling Tea Leaves
You’ll need a level, sturdy platform with a shock-absorbent, non-slip surface.
A standard fixture in North American households, a kitchen bar may serve as an excellent rolling platform. Usually elevated to an average waist height, kitchen bars are secured to the floor, eliminating wobble when applying pressure to the bar top.
You can use an inexpensive dinner placemat on the bar top as a rolling surface. A placemat made of a thin sheet of closed-cell foam is ideal because it absorbs some of the pressure you apply to the leaves.
Mats with a non-abrasive, bumpy, or undulating surface are just grippy enough for tea leaves. (But avoid high-friction silicone mats, which hold too fast and rip leaf tissue).
Use masking tape to secure the placemat to the bar top.
There are many ways to improvise a rolling platform and surface with similar features. Be creative; you may already have what you need to roll tea leaves at home.
The Steps for Rolling Tea Leaves
What you’re about to do is laborious and may induce soreness in your hands, wrists, forearms, and back.
It may also be the most gratifying culinary activity you’ve ever experienced!
Here are the procedures for rolling tea leaves by hand.
- Clean your rolling surfaces with hot, soapy water and rinse.
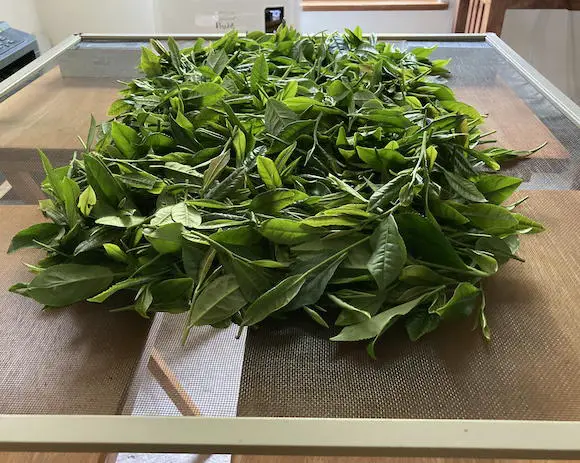
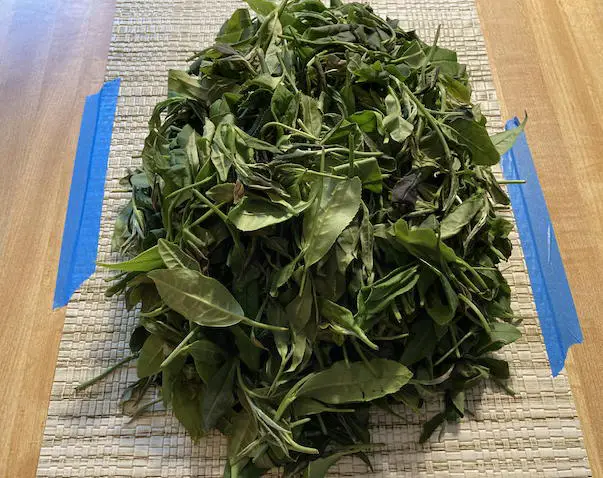
- Lay the withered tea leaves in a pile on the platform. After a good wither, your leaves will have decreased in weight and volume.
- Notice that the leaves may feel coolish and velvety and have a pleasant, fruity smell. Keep notes because these sensations will soon change.
- Gather the leaves into a mound, and with both hands, gently rotate the leaves with one hand moving towards your body and the other hand away from you.
- As you rotate the pile, tuck the leaves moving away from you so that what’s on top gradually turns to the bottom. This tucking movement is how you get the pile to roll rather than merely rotate.
- After a couple of minutes of rolling, the leaf pile will feel tight in the center, and it’s time to break it up. Gently pull apart and mix up the leaves to move those in the center to the exterior and vice versa.
- Remake the pile and continue with your roll, using more downward pressure this time. The bundle of leaves will soon look like a partially deflated ball and become easier to roll.
- Carefully break up the leaf ball when tight and repeat the steps above with ever-increasing pressure each time.
- Roll and break. Roll and break. And so on.
I’ll explain what changes to look for as you continue, but first, a short detour into alternative methods of rolling tea leaves.
What if You Can’t Roll Tea Leaves by Hand?
Rolling tea leaves with just your bare hands can be challenging. Fortunately, we can use other inexpensive tools to achieve excellent results.
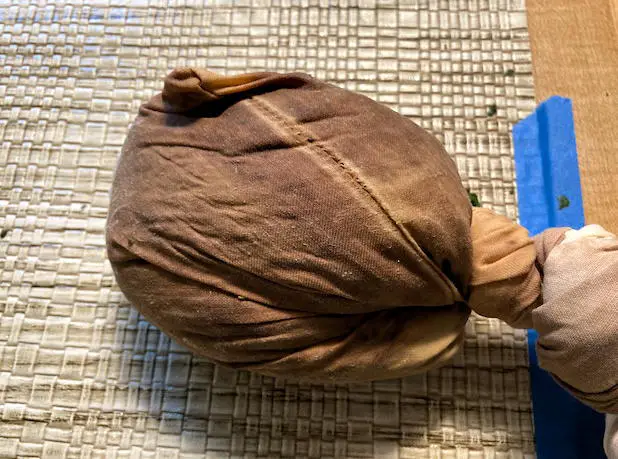
One alternative is to roll the tea leaves in the corner of a rectangular pillowcase, like the ordinary ones for a bed pillow. Fabrics of either cotton or synthetic materials are suitable. Just make sure that the pillowcase is clean and free of laundry detergents or softeners.
With the leaves settled into a corner, close up the pillowcase with one hand and then spin the entire thing hard in a circular motion like a weight on a string.
Now the leaves should be loosely packed into the corner of the pillowcase.
Next, grip the fabric with one hand just above the leaves, and then use the palm of your other hand to roll the leaf ball across your rolling surface.
As you roll the leaves under your palm, the fabric will twist tightly and squeeze the ball of leaves. You’re now applying torsion to shape the leaves and, eventually, express tea juice.
Increase the rolling pressure even more by using the knot in the pillowcase as a fulcrum to lever against the leaf ball.
After only a few twists and rolls on the knot, you’ll need to open the pillowcase and break up the leaf ball. Just spread the fabric, reach in with your hands, and gently break up the ball with your fingers.
Repeat the steps to spin the leaves into the corner and then twist the fabric to make a tea ball.
If your harvests are really small, try using a sushi mat to squeeze withered leaves into a cigar-shaped wad. You might rip a few leaves but you’ll get a surprising amount of pressure exerted on the leaves and a good expression of tea juice.
How Long to Roll Tea Leaves for Black Tea?
Just like during withering, the duration of the rolling step is essential.
Here’s what to watch for as you roll through the stages of leaf change, with approximate times for when these things start to happen.
- Early. The tea leaves will soften and become tacky or sticky as you near 15 to 20 minutes of continuous manipulation. The leaf color will change from light green to dark green.
- Middle. You’ll feel light moisture on the leaves at around 25 minutes and heavier dampness near 35 minutes.
- Late. After 40 minutes or so, the dampness on the leaves changes into a viscous liquid, the tea juice, that froths as you roll the leaf ball ever tighter. Froth is more apparent in the center of the leaf ball, and it will quickly dissipate after you break open the leaf ball to rearrange the leaves.
When to Stop Rolling Tea Leaves
Continue rolling for about 10 minutes past the point when the tea juice on your hands or pillowcase fabric turns slightly brown.
A color change indicates the beginnings of catechin oxidation and a time for you to rejoice at having made it this far!
Altogether, rolling tea leaves for black tea may take 55 minutes to a little over a full hour to complete.
You can take short breaks from rolling to rest your body. But keep in mind that once you release the black-tea compounds, a biochemical change has begun that you can’t reverse. In other words, the total time spent rolling matters, so don’t rest too long.
The main result to look for is browning tea juice. At this point, sugars and acids get released along with proteins that stick together. Rolling further whips air into the mix.
If you’re a baker, you’ll know that these are the same conditions for making meringue for pie. But here, you’re making a tea meringue!
Other Tips for Rolling Tea Leaves
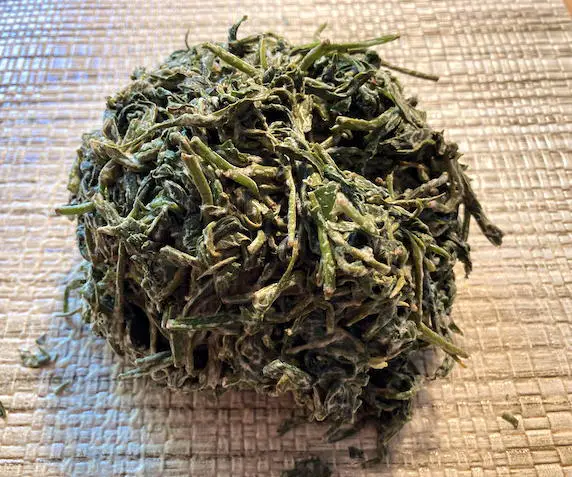
When you finish rolling, your tea leaves should look long, thin, perhaps twisted, and have dark green mixed with light green hues.
The plucked end of the stem may also be brown or reddish.
It is also normal to have a few fragmented bits mixed in with whole leaves and stems. Do not discard the “brokens”! These little pieces will oxidize more deeply than whole leaves and impart the most exquisite flavor and mouthfeel.
And one other tip. Wear food-safe, disposable gloves if you feel like you’re not getting a good grip on the slippery tea leaves. I also wear gloves to keep my hands from getting tea-stained and dehydrated.
Finally, it’s fun to admire your rolled tea leaves but move on to the oxidation step once you finish. You don’t want the leaves to dry out, putting the brakes on the biochemical changes underway.
Step 4: Oxidation of Tea Leaves for Black Tea
After rolling tea leaves for about an hour, you will welcome a break in the action. Your tea leaves, however, will start to rock!
Oxidation is the phase of black tea production where tea catechins react with oxygen and polyphenol oxidases to form ever-larger polyphenols or polymers.
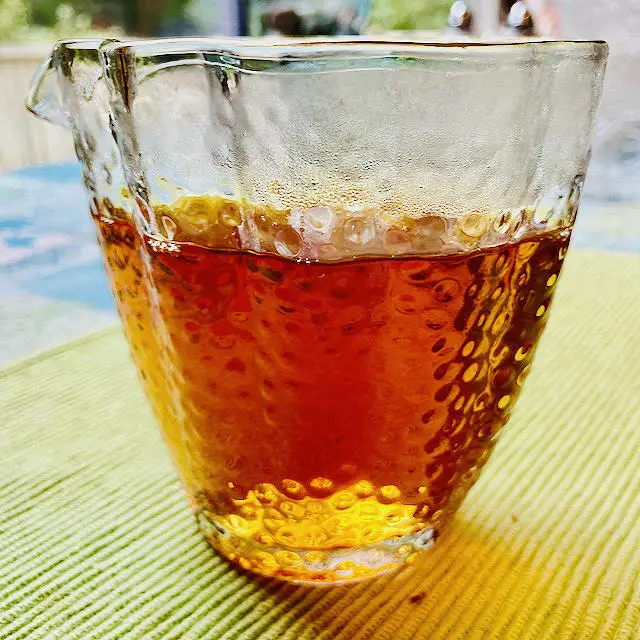
These polymers change the color of tea leaves from dark green to brown and give black tea its distinctive reddish-orange color in the teacup.
Oxidation also removes some bitter taste in tea caused by the catechin called epigallocatechin gallate, or EGCG. Green tea, which has limited oxidation, retains EGCG and bitter notes.
We don’t want bitter black tea, so we’ll let the enzymes work their magic on EGCG.
I’ll highlight a couple of other significant changes during oxidation as we go.
Materials for Oxidizing Tea Leaves at Home
The three keys to good oxidation of tea leaves are air temperature, humidity, and time.
Specifically, you need to maintain the air temperature around 95–100℉ (35–37℃), at about 95% relative humidity, for up to three hours total.
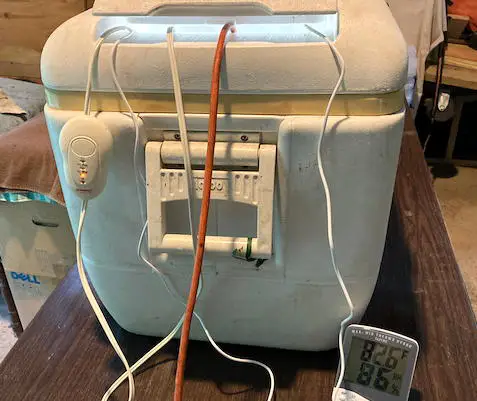
Of course, you can’t maintain a space in your home at these ambient conditions (and you wouldn’t survive it anyway!). Instead, you can build an oxidation chamber that retains heat and humidity for the required time frame.
For example, you can use an ordinary 150-quart (141 liters) beverage cooler for the chamber. Large-sized coolers have greater air capacity, which improves oxidation, and the spacious interior is easy to reach into to access the tea leaves.
The interior material of most high-quality coolers is polypropylene which is FDA-approved for food contact (and nor should the tea leaves touch the interior plastic in any case).
One main lid with a small hatch for quick access is convenient for an oxidation chamber. The hatch allows you to pass through electrical cables and inspect the oxidizing tea leaves inside. It’s also helpful in regulating air temperature as the chamber heats up.
Chambers made of glass such as terraria for plants or reptiles may also serve your needs. I’ve seen other tea makers use opaque storage bins, which are inexpensive and easy to find locally.
A large stainless steel pot with a lid can also serve as a chamber. Be creative and you’ll find what you need.
Heating pads made for warming sore muscles work well as a heat supply. Remove the outer fabric around the pad because it will retain moisture. And be sure that the pad is water-resistant.
And the sun’s rays are also an effective source of heat. Just be sure to monitor the temperature closely so that the interior of the chamber doesn’t go above 100℉ (37℃).
Of course, you’ll need a thermometer to monitor the temperature inside the chamber and a hygrometer to check humidity.
Caution! Check the Chamber for “Industrial” Aromas
Regardless of your chamber design or heat source, be wary of unpleasant smells that suggest volatile compounds are off-gassing, possibly absorbed by tea leaves.
For example, heating pads for starting seeds have excellent temperature regulation, but some brands release industrial-chemical aromas. If your sense of smell isn’t good, ask someone to inspect the oxidation chamber under working conditions to check for foul odors.
How to Oxidize Tea Leaves for Black Tea
Test your oxidation chamber before your first batch of tea and note how quickly it warms to around 100℉ (37℃). Then preheat the chamber while you roll leaves so that it’s ready as soon as you finish.
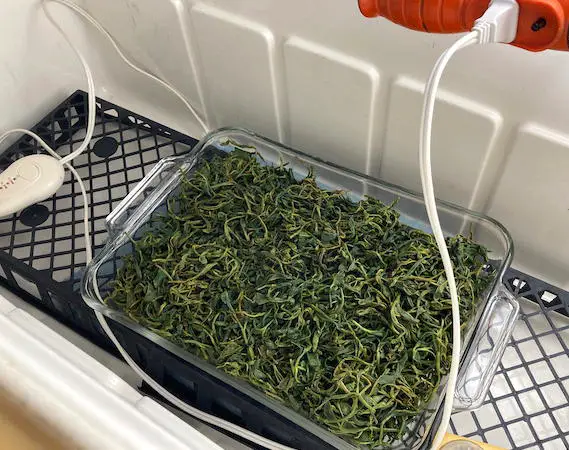
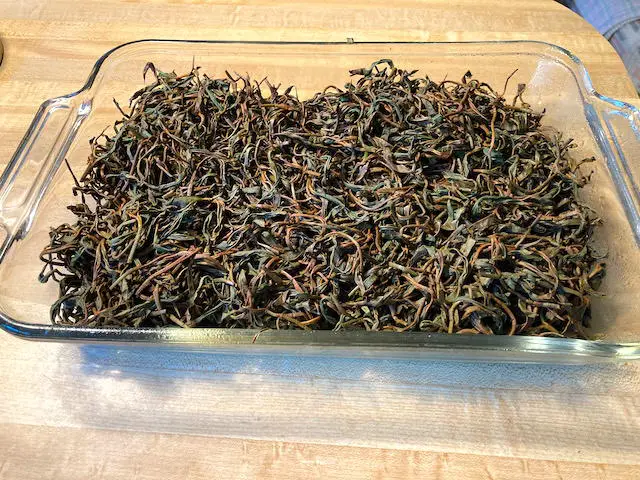
After rolling, break up the tea ball and layer the leaves loosely and about an inch deep in a shallow glass tray or dish.
Ceramic or stainless steel trays work, but if possible avoid using trays made of reactive metals such as iron, aluminum, or copper.
Check the relative humidity in the chamber and spray-mist the chamber lid and sides with water to bring RH close to 95%. Hang damp towels in the chamber if misting isn’t sufficient.
If everything is ready, put your tray of leaves into the chamber but don’t put the tray directly on the heating pad. Elevate the tray above the pad with an inverted 1020 daisy tray or similar, or put one-inch blocks under each corner of the tray.
At the end of the first and second hours, take the tray of leaves out of the chamber and quickly close the lid so that you don’t lose the heat and humidity.
Then gently stir the leaves and lightly spray-mist with water.
Inhale deeply with your nose near the leaves to avoid missing aromas.
You may detect geranium, rose, woodiness, and caramel notes and smell a warm, floral bloom from the oxidizing leaves.
Take in these fantastic aromas; there’s nothing else like it!
What’s Happening During Oxidation of Tea Leaves?
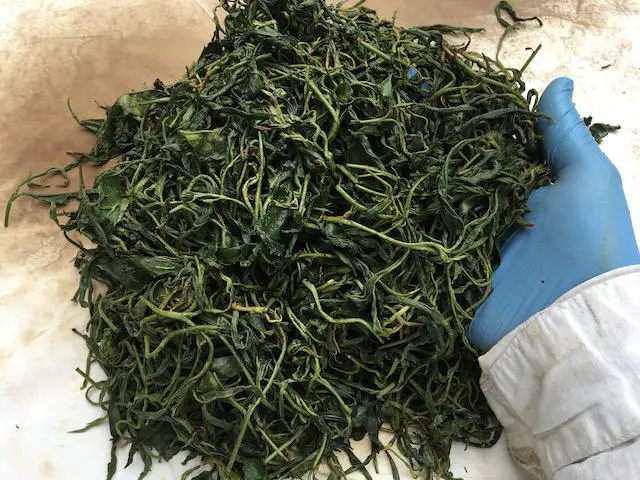
As oxidation proceeds, you’ll soon notice the leaves turning from green to olive-green or brown. Not only is oxidation causing a change of color, but the breakdown of chlorophyll molecules plays a role. Green tea, in contrast, is green because it still has intact chlorophyll.
A reaction called Maillard browning also contributes to color change. This spontaneous reaction occurs when amino acids and sugars combine to make brown-colored compounds.
Interestingly, Maillard browning occurs because polymerized catechins can’t bind to the sugars released during rolling. Again, there’s little Maillard occurring in green tea, so it is green.
By the way, oxidized tea juice will stain hands, clothes, and the pillowcase for rolling. You can usually wash off fresh stains on your hands with soap and water, but some stains will need mild acids like lemon juice or vinegar and water.
And the pillowcase will probably stain permanently; consider those marks a badge of honor!
When to Stop the Oxidation of Tea Leaves
Remove tea leaves from the oxidation chamber when three things happen:
- oxidation is into the 2nd or 3rd hours;
- stems and leaves are light brown and olive-green, respectively; and
- the aroma of a strongly scented wax candle has emerged.
You may not detect the same aromas as I do. It would be best to make up a memorable description of the aromatic changes because they will help you learn when to terminate oxidation.
If you oxidize too long into the indicator-aroma stage, you risk losing the pleasant black tea bouquet forming on the leaves.
And letting oxidation run for longer than three hours may sour the tea leaves.
Don’t be afraid to experiment here. For example, you can split a batch of leaves into one sample with two hours of oxidation and another with three. If there’s no meaningful difference, then in the future you can go with the shorter treatment and move sooner to the final step, tea drying.
Step 5: Drying Tea Leaves for Black Tea
One goal of drying black tea is to preserve the roasted, sweet, and warm flavors that arose during oxidation.
Another is to prevent spoilage, and proper drying of the leaves accomplishes both goals.
First, by heating the leaves to the optimum drying temperature, you remove water that would otherwise prolong oxidation. Heating also breaks down oxidases that were crucial in the previous tea processing steps but not desirable during drying or later on in storage.
With oxidation stopped, you prevent further change in the flavor and aroma characters of the tea.
And second, drying the leaves denies microbes the moisture they need to colonize stored tea. Taints by bacteria or fungi may be desirable in some teas, but black tea is no place for a funky, composting aroma or taste.
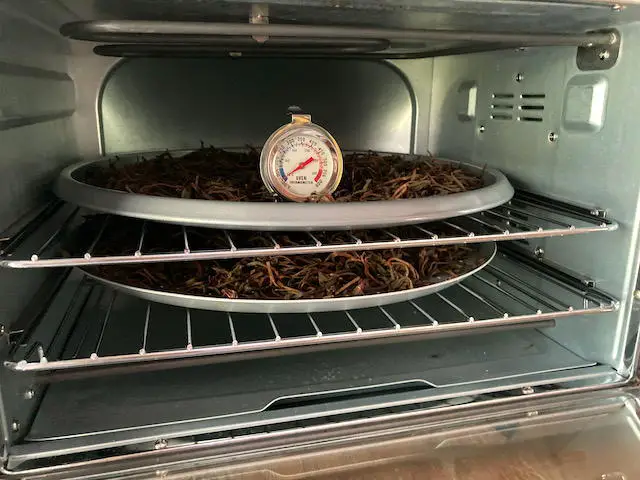
How to Dry Tea Leaves for Black Tea
As with wither and oxidation, the challenge is to find the sweet spot for drying that produces the best outcome.
I recommend you dry oxidized tea leaves on a baking tray in an oven between 180 and 200℉ (85–93℃). It may take 100 minutes or more to dry the leaves, depending on the starting moisture and your oven’s quirks.
If you have a conventional thermal oven for tea drying, you must also stir the leaves about every 20 minutes. The reason is that conventional ovens don’t have a fan and exhaust system to circulate air. If there’s no air circulation, then humidity can build up around the leaves, resulting in slow and uneven drying.
Convection ovens, in contrast, circulate air around the tray of tea leaves which eliminates the problem of uneven drying. Use a convection oven if available, and save yourself some labor and worry.
The Best Temperature for Drying Tea
You might want to increase the oven temperature to speed up drying, but this is a mistake.
Temperatures below the boiling point of water (212℉/100℃) preserve black tea aroma while higher temperatures burn them off.
The other problem is temperatures above boiling create a dry, hard casement on the outside of the tea leaf. Casement, in turn, traps moisture in the leaf and causes the tea to spoil during storage.
On the other end, temperatures below 180℉ may cause the tea leaves to “stew” rather than dry. In this event, oxidation continues, and undesirable aromas may form.
The bottom line is to keep the oven temperature within the 180–200℉ range and fine-tune the oven settings for optimum drying.
When to Stop Tea Drying
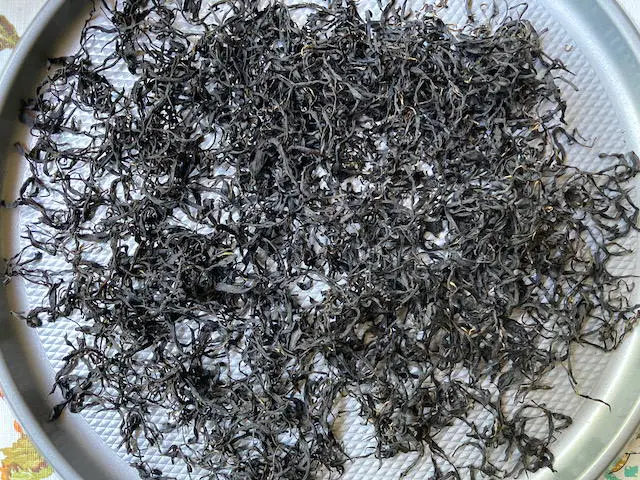
Not all tea leaves are the same shape or size. Look for the thickest pieces of tea leaf and test for dryness.
Your tea is ready when the bulkiest pieces snap, rather than flex, where the leaf connects to the stem.
A flexible leaf-stem joint indicates that moisture remains and the tea needs more drying, but don’t overdo it. Usually, just five more minutes in the oven is enough to complete drying.
Tea leaf that crumbles when handled has gone too far. Sorry.
Materials Needed to Dry Tea Leaves
Standard oven baking trays such as cookie sheets are acceptable for drying tea leaves. However, keep in mind that the acids in the leaves may react with aluminum. Use non-reactive ceramic or stainless steel trays if you can.
If you want to use a convection oven, there are models for the countertop that you can dedicate to tea drying. A tea oven separate from your kitchen oven will also spare you conflicts during meal prep.
Whichever oven you choose, check that it maintains temperatures below 200℉. Many conventional ovens, for instance, cannot keep temperatures on the cooler end, which could spell disaster for your drying tea. Always use an oven thermometer to verify that the temperature that you want is what you’re getting around the tea leaves.
Sun-drying Tea Leaves Outdoors
Many tea makers prefer to dry tea outdoors under the full sun. Indeed, if no oven is available, the sunshine may be your only option.
And it’s easy to sun-dry tea. Set up a table in a location where you anticipate full sun for the day. Spread a clean cotton sheet on the tabletop and lay your oxidized tea leaves thinly across the sheet. Pile the leaves deeper if you think they’re drying out too fast.
You’ll have to leave the tea out from 10 am to 5 pm in our northern latitudes. But even after a full day of sun exposure, your tea will benefit if you bring the leaves indoors to continue drying through the night.
Sun-dried tea should feel crispy and springy, but don’t be surprised if the leaves don’t dry as well as in an oven.
The other frustrating aspect of sun-drying is protecting the leaves from the wind that blows tea off the sheet. And regrettable contributions from birds don’t help either.
You have to accept these limitations of drying tea outdoors and do your best.

How to Store Your Homemade Black Tea
There is one more step after drying: the storage of your homemade black tea.
But there’s no secret here. Use any clean container sealed airtight, including glass jars, cookie tins, or food-safe zipper packets.
Then keep your tea at room temperature or cooler. And if you’re storing tea in a translucent container, never expose it to sunlight which induces staleness caused by photo-oxidation.
You might find that the quality of black tea in the cup improves a few weeks after drying. Keep tasting notes so that you can find the best storage conditions.
Summary: How to Make Black Tea at Home
If you have made it through this guide, you might wonder why I think black tea is good for beginning tea makers. With so many steps, aren’t there a lot of chances for failure?
I don’t think so. Each step in this recipe forgives small mistakes, and deliberate tinkering is informative rather than catastrophic.
For example, it’s not fatal if you forget about your withering tea until hour 13. You may, instead, appreciate the effect of your “mistake” on the quality of the tea.
Similarly, tweaking the tea-processing variables is not just tolerated but required to make a black tea that carries your creative stamp of excellence.
You’ve got the guide, so now go forth and make great tea!
References
The activity of enzymes vital for tea oxidation changes over the course of black tea processing and reveals opportunities for adjusting your methods.
The degree to which tea leaves are withered has a dramatic impact on the character of black tea, with about 60% moisture remaining as an optimum for flavor and aroma.
The taste and aroma compounds of the camellia teas are amazingly complex, with many precursor ingredients required to create the character of black, green, oolong, and other true teas.
Mike grows and crafts tea in North Florida, USA. He has advanced degrees in biology, and has undertaken coursework in manufacturing Camellia sinensis teas. Mike is a member of the US League of Tea Growers (USLTG) and has presented invited talks on tea growing. Send him a note through our Contact Page if you'd like to talk about tea.
Mike,
Very nice article, well thought out and written in an understandable manner.
Thanks, Lee!
This is reading a book on my favorite subject. I was actually doing all this while reading this excellent, excellent guide. Thank you Mike!
Donnie Barrett
Fairhope, AL
Mike Thanks for the descriptive article. I am going to try one day. Just for your information – I hear in Venezuela (?) they make tea from coffee leaves. I tried but failed it seems complicated.