A sand point well is an inexpensive, do-it-yourself well for drawing water from 10 to 30 feet underground.
Homesteaders, farmers, and ranchers install sand point wells to get off municipal water or access a high water table in off-the-grid locations.
Others are looking to install an emergency backup well if municipal supplies are compromised.
In my case, I don’t have the budget to install a costly well dug by pros, but I do need a reliable water supply for my tea garden.
After doing a lot of research, I’ve broken down the sand point well project into two stages: 1. digging/sinking the well into the ground, and 2. assembling a means to distribute water to a home or irrigation system which may include a solar-powered pump.
Today I’ll share what I have learned about digging and sinking a well using four different methods: augering, driving, jackhammering, or jetting.
I think that for some, the physical labor involved with this stage of the project may make a difference in your decision to install a sand point well.
Let’s start with a description of how sand point wells function and then a discussion of the DIY techniques for putting in a well. At the end of the post, I compile a list of materials and tools that you need for assembling a sand point well kit.
Table of Contents
- How Does A Sand Point Well Work?
- Where to Dig a Sand Point Well?
- Augering a Sand Point Well
- Using a Post Driver to Install a Sand Point Well
- Jackhammering a Sand Point Well
- Jetting a Sand Point Well
- What’s the Best Way to Install a Sand Point Well?
- Sand Point Well Kit: Materials and Costs
- References
How Does A Sand Point Well Work?
A sand point well, which is sometimes called a driven point well, operates like a big drinking straw stabbed into the ground.
Water percolates along a natural gradient from the surrounding earth and into the lower end of the straw.
In reality, a sand point well is an assembly of 5-ft sections of galvanized steel pipe or PVC pipe connected end-to-end. To move water to the surface, you either suck it up with an above-ground pitcher pump or a suction pump or you push it to the surface with a below-ground, submersible pump.
Pipe size depends on your needs and budget, but most DIY wells are limited to one-and-a-quarter inches or two inches in diameter.
On the tip end of the well, there is a hardened, cone-shaped drive point that’s a little wider than the pipe. The well-point (or drive-point) is the part that makes direct contact with the earth as you sink the well into the ground.
Between the well-point and before the first length of solid pipe is the crucial piece of the well. This section has a three-foot-long cylinder of well-screen with an outer jacket of perforated steel and an interior layer of fine wire or mesh.
If you’re using PVC instead of galvanized pipe, the well-screen is a perforated pipe cut with one to two-millimeter wide, perpendicular slits.
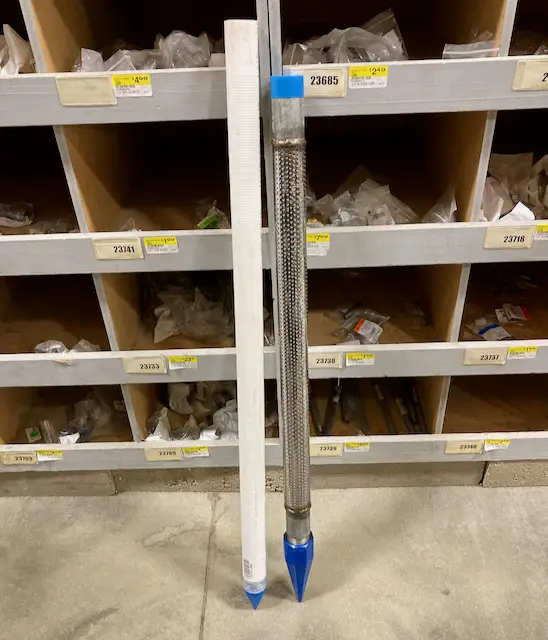
Groundwater passes through the screen and mesh—or through the slits in PVC—and filters sand and larger dirt particles out of the water.
Water stops filling the drive pipe when the water pressure equals the atmospheric pressure. Seldom is the water pressure great enough to turn your shallow well into an artesian spring overflowing with a small gusher of water.
Where to Dig a Sand Point Well?
Sand point wells work best in sandy soil or in soils mixed with sand and pea-sized gravel. The bottom of a hillside, near a pond or creek, and other low-lying areas often have a shallow water table.
Rocky landscapes require large-bore drilling or hydro-fracturing and are generally unsuited for wells dug with hand tools.
Also keep in mind that water in a shallow layer of sand may experience seasonal water level fluctuations that cause the well to dry up, possibly when you need it most.
And surface contamination may percolate into shallow wells so be careful to avoid locations with a dubious history of industrial or agricultural waste.
In other words, choose the location of your well wisely and test the water quality before use.
Now, how do you get the sand point well into the ground? Here are the four methods that I have explored.
Augering a Sand Point Well
If you think the water table is 20 feet deep or less, you can use a hand-operated auger to dig a borehole for the well.
An auger is a horizontal handle connected to a pipe shaft with a pair of spade-shaped blades at the end. The blades cut and collect a scoop of loosened soil as you turn the handle.
To dig deeper, you first pull the auger out of the hole and dump the cuttings above ground. Then you couple a three-quarter-inch pipe extension to the auger and continue your dig, adding extensions to the auger shaft as you go.
The gap between the blades sets the width of the borehole. The smallest pair is four inches wide, but you can adjust the width to five or six inches.
Here, your effort is to rotate the auger through the soil and pull up the combined weight of cuttings, extension pipes, and auger blades.
If each scoop gets you six inches of depth, then to dig into a 20-foot-deep water table, you’ll have at least 40 total lifts of the auger, with each scoop needing three to six turns per scoop.
I haven’t seen this done, but maybe you can use block and tackle on a tripod derrick to hoist the auger along with the cuttings. If not, you’ll have to rely entirely on muscle power to clear the borehole.
In any case, augering is a lot of labor.
When to Stop Augering a Well
As you dig deeper, check the cuttings for moisture. If you think you’ve hit a water-bearing formation, drop a weighted string down the borehole and check the depth.
When the borehole hits water, you lower in your assembled well-pipe, screen, and well point and backfill with the excavated earth.
The Downside of Augering a Well
One risk with this technique is that the augered borehole walls collapse towards the center before you install the well.
A collapsed hole is worthless unless you auger out the earth. And even then, it may happen all over again.
One solution is to install a PVC pipe casing before installing the sand point well. The casing prevents the borehole walls from caving in around the well-screen.
However, the trouble with casing an augered borehole is that you have to wait until you’re finished augering and then slip in the casing before there’s a cave-in.
In other words, hold your breath and get it done quickly!
Using a Post Driver to Install a Sand Point Well
The most straightforward method of installing a well-pipe is with a post driver.
Post drivers are hand-held, closed-end steel tubes for pounding fence posts into the ground.
There are variations in design, but post drivers are at least 12 pounds and have handles for banging the driver tube down onto a post or well pipe.
You have to screw a drive cap onto the top of each pipe section; otherwise, you’ll destroy the pipe threads as you pound away.
Alternatively, you can use threaded pipe couplers as a drive cap and replace them as you extend the drive pipe.
The racket of slamming a driver onto a pipe is loud and will make you want to jam your fingers in your ears (try earplugs instead).
And it’s exhausting. For example, if each 5-ft section of well-pipe requires at least one driver strike per inch of depth, a 20-foot-deep well will take at least 240 strikes.
That’s a lot of weight to lift and a lot of banging.
Also, I haven’t seen anyone use a post driver to install PVC pipe. The force of the blow would probably shatter the PVC.
Try to drive the pipe perpendicular to the water level underground. A straight pipe will make it easier to install the pump later on.
No Cave-ins with Post Drivers
The advantage of a post driver is that you don’t excavate earth as you drive the well-point, so there’s no problem with cave-ins.
The downside is that if you drive a well-pipe, you can’t install casing. You’ll see in a minute why a casing is a good idea in many circumstances.
Jackhammering a Sand Point Well
A jackhammer is a powerful tool for busting-up concrete, asphalt, and rock.
With a two-inch well-bit installed, you can sink pipe into the ground much faster than you can with a muscle-powered post driver.
For example, I saw a young man in a video jackhammer a well-pipe one foot deep in under one minute.
Here again, though, you have to use galvanized pipe because PVC pipe will break under the force of a jackhammer.
To hammer in a shallow well, you can get by with an electric (non-pneumatic) jackhammer with at least 35 foot-pounds of impact energy and 1,000 blows per minute.
To power the jackhammer, you can use a 115/120V AC/DC, 20 Amp outlet or, if working off-grid, a gas-powered generator with at least a 2,500-watt output.
A heavy-duty, pneumatic jackhammer is not necessary for installing a small well-pipe.
Jackhammers Are Beasts!
The catch is that non-pneumatic jackhammers are heavy. One model I researched weighs 63 pounds, so you may need help wrangling it onto a pipe section.
You can step onto a ladder and lower the jackhammer to the pipe from a comfortable working height. Get a friend to help. And plug your ears.
Jackhammers are pretty cheap to rent. The last time I checked, they wanted about $37 for three hours of use. That’s plenty of time to jackhammer a well but probably not half what you’d need to sink one with a post driver.
Be sure to tell the rental shop that you’re putting in a well so that they can provide you with the correct well-bit.
Jetting a Sand Point Well
The last technique for installing a sand point well is to jet water to make a borehole and wash a pipe into the ground.
If you have pointed a stream from a garden hose into a pot of sand, then you’ve jetted a borehole. As you blast the hose further into the pot, the soil moves up along the borehole wall and to the surface.
The difference with a well is that you use a PVC wash pipe with a toothed cutting head to drill as the water saturates and loosens the earth.
High-pressure water is not required here because the washing and scouring action of water and the cutting head that frees up the earth. Wash boring is another name for well-jetting.
A pipe wrench gives you a handle to rotate the wash pipe as it sinks under its weight. A slight downward pressure applied by you to the wrench also helps.
Cuttings of sand and other fine particulates move outside the wash pipe and along the borehole wall. If you’re successful, cuttings will accumulate above-ground at your feet.
To deepen the borehole, you couple lengths of wash pipe until you hit water.
Pay attention to the texture of the cuttings. Many well-diggers look for large-grit sand and dig past fine “sugar sands” that can clog the well-screen.
A promising sign is when water washes up from the borehole, clear and clean. Leave the wash pipe in place and let the water level stabilize to see where you’re at in the water table.
The Wash Pipe Is the Well Casing
At this point, the procedure may differ among DIY well jetters.
Some pour bentonite clay down into the annulus which is the space between the wash pipe and the borehole wall. Bentonite expands up to thirteen times its dry volume when saturated with water and fills the annulus.
Bentonite also displaces cuttings more efficiently than water alone and, when it sets, seals the pipe in place.
Others skip the bentonite step and lower the well-pipe with screen and well-point into the wash pipe. You then pour in enough pool filter sand (#2-grade silica sand) to surround the length of the screen.
Why Case a Well
And now comes the utility of casing a well.
Pull up the wash pipe just to the top of the screen, or about three feet above the well-point.
Wash down the pool sand to fill the annulus around the screen. Pool sand prolongs the life of the screen by filtering out fine materials from the groundwater.
You leave the wash pipe in place with the well-pipe inside it. The wash pipe now functions as a casing that prevents cave-ins from fouling the well.
Of course, the well-pipe has to be smaller than the wash pipe. A six, four, or three-inch wash pipe can accommodate a two or a one-and-a-quarter-inch well.
To finish the well, you trim the above-ground pipe to accommodate your plans for the next stage, installing a shallow well pump.
By the way, don’t confuse the well-jetting technique with a single stage jet pump which is a type of water pump that you can install above-ground if it’s appropriate.
Don’t You Need Water to Jet a Well?
You’re probably wondering how you jet a well if you don’t have a water supply. And if you already have water, why even dig a well?
First, landowners often dig wells to supplement an existing system. For example, a household with a municipal supply may want a DIY well to save on the expense of watering a garden. In this case, they would jet city water.
Second, you have to haul water to the well site if you work remotely without a water source. You then set up a gasoline-powered, water-transfer pump to recirculate water between the well and containers where debris settles out.
A water-recirculating system isn’t as complicated as it sounds, but it does add another layer of expense and effort to the project. Research different methods to see if this is something you can execute.
What’s the Best Way to Install a Sand Point Well?
Here’s a summary of the pros and cons of the different methods of installing a sand point well.
Augering a borehole and driving the well-pipe are the most physically challenging ways to get a well into the ground. Using these two methods, you’ll need strength and stamina.
But on the positive side, augering and driving require the least technical know-how. You can auger the borehole to get started and finish with a driver in some circumstances.
And if your borehole doesn’t collapse, you can install a casing after augering and get the benefits of jetting that I described above.
Jackhammering a well-point is fast and efficient, but it will require some arm strength to sustain and assistance from a second strong person to help with the awkward weight.
Finally, jetting a well is effective because the wash pipe protects your borehole from collapse as it sinks into the ground. Also, less physical labor is required from you because the wash pipe/casing sinks under its weight as materials wash up and out.
Whichever method you choose to install a sand point well, you are in for a well-digging adventure!
Sand Point Well Kit: Materials and Costs
Most big box stores sell the parts for a sand point well kit. However, I have found that Menard’s online has the most comprehensive selection of tools and materials for this project.
Below is a table of costs for most of the items you’ll need to install a sand point well. Your total costs will depend on the method that you choose and the total number of well points that you install.
Jetting requires both a wash/casing pipe and a well pipe and may, therefore, be the most expensive method. You also have to build a cap for the wash pipe that has fittings for water hoses. This isn’t difficult to do, but it adds more cost (see the References section at the end).
Prices in the table below are current as of the summer of 2022.
| Item | US $ min–max price | Notes |
|---|---|---|
| Well-point, 36-inches long | Minimum of 1 well point required. | |
| 1-1/4″ stainless steel, 80-mesh screen | 42–89 | Research stainless steel screens carefully because the quality varies by manufacturer; some may corrode and have a shorter lifespan than PVC. However, stainless screens have more surface area for about 2X greater flow than PVC well points. |
| 1-1/4″ PVC, slit screen | 9–16 | Install more than one PVC well point to compensate for lower flow than steel screens. Note that PVC well points may shatter when driven into dense earth (sandy soil is best). |
| 2″ stainless steel, 80-mesh | 65–83 | Not a typo; a 2″ well point is about the same price as the smaller diameter. |
| 2″ PVC, slit screen | 18–20 | |
| Well pipe | Price per length | Up to 6 lengths of pipe are needed for one well. |
| 1-1/4″ x 60″, galvanized, male threads | 38–46 | |
| 1-1/4″ x 10′ sch 40 PVC | 15–18 | PVC is usually sold in 10-foot lengths which reduces the expense on pipe couplers. |
| 2″ galvanized, male threads | 60–90 | |
| 2″ sch 40 PVC | 18–21 | |
| Pipe couplings | Price per coupling | At least 1 coupling is required for each length of pipe. |
| 1-1/4″ galvanized, female threads | 10–14 | Steel drive points are wider than the well pipe so that borehole can fit pipe couplings wider than the pipe. |
| 1-1/4″ PVC, inside flush-coupling | 2–3 | PVC drive points are the same width as the well pipe; therefore, the borehole can only fit couplings that are flush with the exterior diameter of the pipe. |
| 2″ galvanized, female threads | 17–30 | |
| 2″ PVC, inside flush-coupling | 2–3 | |
| Other tools and materials | Price per item | |
| PVC cement | 7–10 | The price is per can of cement. |
| Plumber’s tape | 2 | Price per roll. |
| Inline check valve | 28–50 | Optional, but keeps the well primed between uses. Only 1 is needed and is installed above the well-screen. Must be corrosion-resistant. |
| Drive cap for pipe | 11–15 | At least 1 per job and maybe more if the cap is destroyed. Use galvanized pipe coupler as an alternative that resists damage better than a cap. |
| Hand-cranked auger, minimum 4″ wide | 144 | Shaft must have threaded ends for adding extensions. Gas-powered augers can work but may not be as exstensible for depth. |
| 3/4″, 60″ long galvanized pipe extensions for auger shaft | 24–36 ea. | Up to 6 depending on the depth of the borehole. |
| T-post driver | 32–50 | Only 1 is needed; the price depends on the weight of the driver. |
| Pipe wrench | 15–40 | At least 1 needed but 2 is better. Attach the wrench to the pipe above ground as a safety to keep the pipe from falling into the borehole. Price depends on length and size. |
| Sledgehammer | 30–50 | In loose, sandy soils, a sledgehammer may be used instead of a t-post driver. Only 1 needed; at least 8-lb. |
| Post hold digger | 30–60 | Start the borehole with a post hole digger and finish with a pipe driver or an auger. |
References
Wisconsin well-digging regulations.
Minnesota well-digging regulations.
Detailed instructions for making a jet cap and wash pipe.
Mike grows and crafts tea in North Florida, USA. He has advanced degrees in biology, and has undertaken coursework in manufacturing Camellia sinensis teas. Mike is a member of the US League of Tea Growers (USLTG) and has presented invited talks on tea growing. Send him a note through our Contact Page if you'd like to talk about tea.