Probably one of the biggest challenges in gardening is just getting started.
Resistance to startup is especially intense with an unfamiliar crop such as the tea plant Camellia sinensis.
This revered plant is the source of true teas such as green, black, oolong, pu’erh, and other teas.
In the case of growing tea in the USA, the passion for tea in the cup has outpaced the growth in domestic tea farming. Part of the problem is that there is no shortage of skeptics who wrongly believe that tea framing cannot be successful here.
But are the hurdles to starting a home tea garden so impossible? I don’t think so.
This article shares my experiences growing the tea plant from tea seeds. I’ll discuss in detail how to go from germination to up-potting and, along the way, highlight some common pitfalls that novice tea growers might encounter.
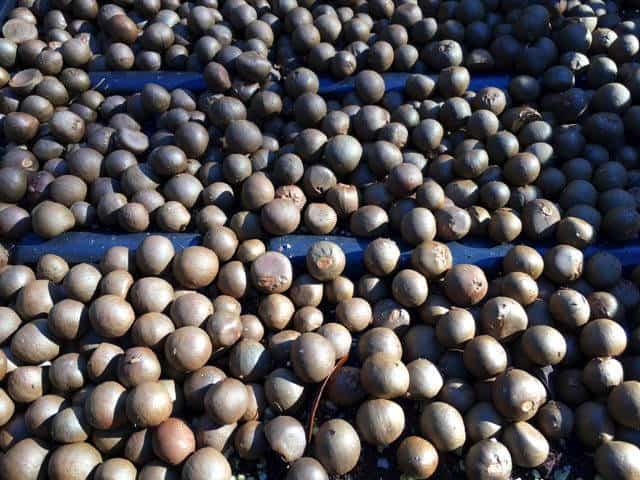
Table of Contents
- Why grow tea from Camellia sinensis seeds?
- The downsides of tea seed
- How to find the best Camellia sinensis tea seed
- How to germinate tea seed: screen first, ask questions later
- How to plant tea seed in starter trays
- Transplant tea seedlings to pots or to the garden?
- Planting your tea seedlings in the garden
- Black tea seeds, green tea seeds, oolong tea seeds: What’s the difference?
- How long does it take to grow tea from seed?
- Exciting times for nascent tea growers
Why grow tea from Camellia sinensis seeds?
Not all tea gardens are started with tea seedlings.
On the contrary, for much of the last century, rooted cuttings, which are genetic clones of a parent plant, have been the propagation backbone of the commercial tea industry.
One key advantage of cuttings is that dozens of future tea plants can be procured from the stems of just one parent plant. Moreover, cuttings allow growers to propagate genetic stock with known, desirable characteristics.
Given such advantages, why would anyone want to cultivate tea seed? Here are two of the important benefits of using tea seeds to start your tea garden.
Benefit 1: Tea seed is convenient
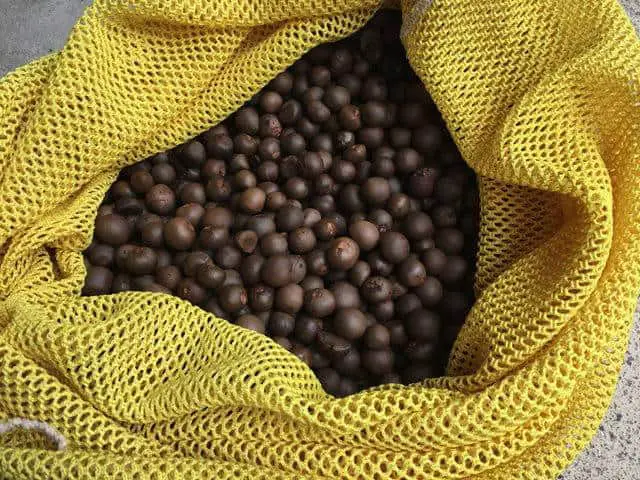
The average diameter of a viable tea seed is about one-half of an inch (about twelve millimeters). Tea seeds also have a tough outer coat that can endure a course of “shipping and handling.”
Because of their small size and durability, thousands of seeds can be conveniently packed into a small box and mailed around the world.
If properly stored in refrigeration, tea seeds may remain viable for several months after harvest. The convenience of storability, in turn, gives the grower flexibility with respect to the timing of planting and the number of seeds to germinate.
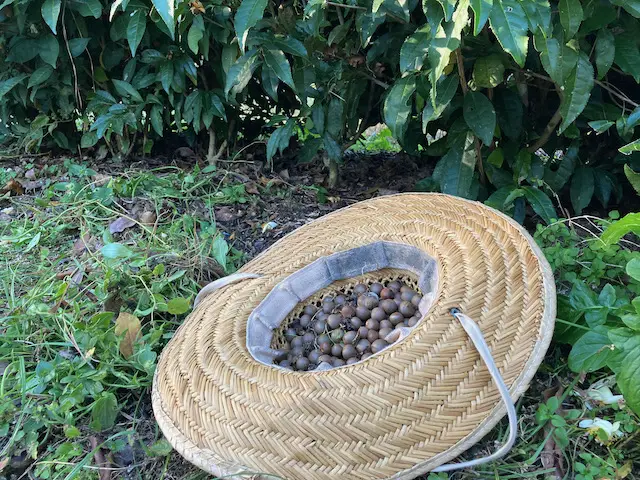
Benefit 2: Tea plant seed is abundant
Tea plants will begin to flower and produce seeds in their second year of growth. And once they get started, watch out! A hedgerow of just 10 or so mature tea plants will easily yield several hundred seeds in an average season.
Benefit 3: Tea seed is genetically diverse
Each tea seed is the product of sexual reproduction and therefore no two seeds are genetically exactly alike.
This is important because even “sibling” seeds that share the same two parent plants (C. sinensis does not self-pollinate) may have alternative gene combinations that differ in performance. For instance, some genes may confer resistance to disease while others enhance cold hardiness.
Planting out tea seedlings is thus a “genetic hedge” against blights and other stresses of the natural world.
Indeed, the future of the tea industry in the US depends on many different tea farms each conducting planned or ad hoc genetic experiments. Out of this effort will eventually emerge the best-adapted tea cultivars.
Consider your own adventures with tea seeds a contribution to this larger agro-experimental undertaking.
The downsides of tea seed
As the saying goes, if it has a front end then it has a back end too. There are indeed downsides to growing tea from seed, and these are as follows:
Downside 1: Tea seed vendors are not always accountable
Globalized trade is a wonderful thing, but there are sometimes issues with accountability. For instance, there is no telling when imported tea seeds were collected. The seller may claim that they collected fresh seed, but how do you really know for sure when the farm is located eight thousand miles away from you?
Downside 2: Tea seed is unpredictable
The reason that tea planters have long favored rooted tea cuttings over tea seedlings is that they knew what they were getting. For example, a cold-resistant tea clone will usually perform as a cold-resistant tea clone in many different environments, even if it may also be susceptible to blight.
With genetically diverse seedlings, in contrast, there is not that level of certainty in performance. This is because sexual recombination breaks up beneficial gene combinations at the same time that it creates them. And because of such genetic variation, there might be considerable unevenness in productivity and survival among seedlings in the field.
Downside 3: Tea seed has low viability
The third concern is related to predictability, and it’ll be a gut punch. Are you ready? Here it is:
Most tea seeds are duds.
That’s right: the chances are very high that the tea seeds you received in the mail are only useful in a game of marbles. To be specific, I’ve learned through experience to expect only ten to fifteen percent of randomly chosen tea seeds to produce a seedling worthy of being planted.
And I’ve had batches with even lower viability than that.
Though you may have a germination rate higher than fifteen percent, this is not the same as seedling viability. You want the highest possible seedling viability which means that you have nurtured individual seedlings that are sufficiently robust to survive the rigors of the field.
In other words, just because a tea seed sprouts a little root and stem does not mean that it’ll grow into a tea plant worthy of being planted into your tea garden.
And here’s the really painful part. Instead of paying what you thought was just pennies for each seed, you have to eventually discard 85 percent (more or less) of your purchase and effectively pay several dollars apiece.
And so the perceived convenience of tea seed collapses into a pile of disappointment. Now what?
How to find the best Camellia sinensis tea seed
It’s not all that bad though. Over the years, I have developed a system to increase the chances that tea seeds are a worthy investment. Try to apply as many of these suggestions as you can to your next purchase of seeds.
How to germinate tea seed: screen first, ask questions later
Let’s suppose that you’ve secured the highest-quality tea seed that you can find. Now you have a few tasks to perform before you can start planting your tea seeds.
The first task is to screen your seed for viability. After screening, you can concern yourself with planting up the makings of your future tea garden.
If you can’t get to screening right away, then you can store your seeds in a partially opened plastic bag that is placed in the warmest part of the refrigerator. You can also place a paper towel or sphagnum moss in the bags to absorb moisture.
But be careful here: a fungus can quickly sweep through the lot and kill your precious seeds. Check frequently to make sure that water is not puddling up within the bag, and remove any seeds that look contaminated with fungal growth.
Step 1: give your tea seed a soaking
To sort out viable seeds from loser seeds, all you need is four items:
- Tea seeds.
- One mesh bag such as a garment bag for laundry or a nylon bag for toting SCUBA gear.
- One plastic five-gallon bucket or similar container.
- One heavy, non-buoyant object to serve as an anchor.
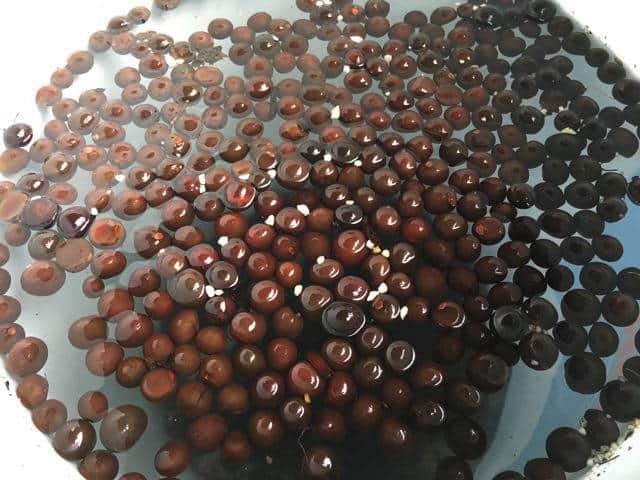
First, fill your mesh bag with seeds to half capacity and then wrap the loose, unfilled end of the bag around the anchor (a small hand-weight is good). Place the bag with anchor into the bucket.
Next, fill the bucket with ordinary tap water and you will immediately notice that the bag of seeds floats towards the water surface. Add enough water to cover the floating bag by an inch or more. With the anchor holding down the bag, all the seeds should be completely submerged regardless of their buoyancy.
Now reach into the bucket and give the floating bag a quick tug or two towards the bottom. Agitating the bag will release air bubbles that are stuck to the seeds.
Place the bucket where it will not freeze or get really hot and let the seed bag soak, undisturbed, for about 36 hours.
At the 36-hour mark, dump the seeds out of the bag and into the bucket of water. You’ll hear the clicking sound of sinker seeds hitting the bottom of the bucket just as you see the floaters rising to the surface. Using either your hand or a wire strainer with a handle, collect the floaters from the water’s surface.
Then collect the sinkers and segregate floaters and sinkers into different bins. You will not mix these seeds together in the future unless you want to repeat the screening process all over again.
Step 2: give your tea seeds a rest
Fill into shallow flats with drain holes a potting medium with both excellent drainage and moisture retention. If you don’t have flats, any shallow container will do so long as it drains. A two-to-one mix of peat moss and perlite works well for seed trays.
Alternatively, adding more perlite and coarse vermiculite to a store-bought soil mix improves the passage of water through the medium while at the same time keeping the medium damp.
Spread a single layer of seeds evenly onto the medium. Do not cover the seeds with the medium; just leave them on the soil surface, as if they are resting on the ground underneath their parent plants.
Next, place your soil-and-seed trays in a space that receives partial sun. Alternatively, you can place trays in the full sun but cover the seeds with a fabric or other contraption that throws at least 80% shade. I like to use heavy-duty flower baskets with slotted bottoms and sides that allow the passage of dappled sunlight onto the seeds.
Do not let the seeds overheat! If you have any doubts about temperature exposure, move the seeds to the shade and leave them there indefinitely.
Similarly, protect the seed flats from freezes.
Mist or spray the seeds with water on a regular schedule. The challenge here is that you don’t want the seeds to desiccate, nor do you want the seeds to stay water-saturated. Fungal infections are the enemy of tea seeds so keep an eye on moisture levels and fungus. It should be damp but not soggy.
If you are starting seed when it’s warm outside, then you can leave your seed trays out in the rain. The beneficial effect of rain on seed germination is often quite astounding. Nature knows best, I suppose.
Next comes the tedious part of this process, which involves a lot of watching and waiting.
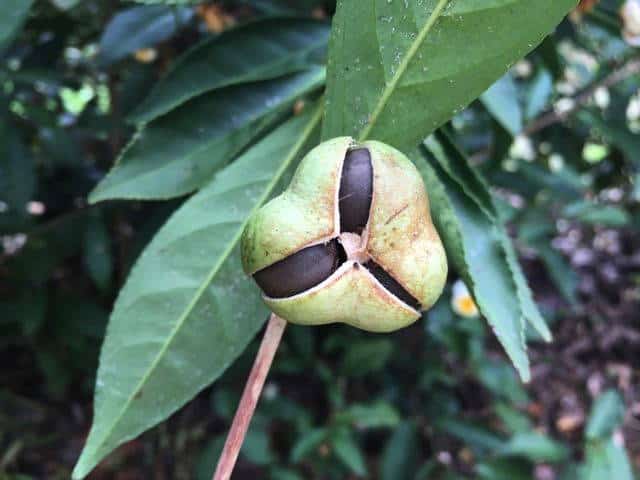
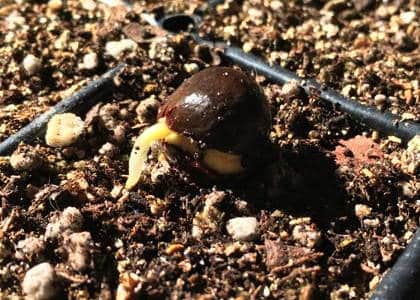
Step 3: check for cracks in the seed coat
In order for the tea seed to germinate, the tough outer coat has to first crack open. Alternating periods of hydrating and drying cause the seed coat to expand and contract. In turn, little cracks are formed which allows water to be absorbed by the developing embryo. As the embryonic tissue grows, it forces open ever wider cracks. This is what you what to happen.
Every other day, check the seeds for cracks. You might be able to see the yellowish endosperm (i.e., the seed’s nutrients) through the crack and this is a good sign. Turn the seeds by rolling your hand over the lot and further inspect for open seeds. Separate out promising seeds for the next step.
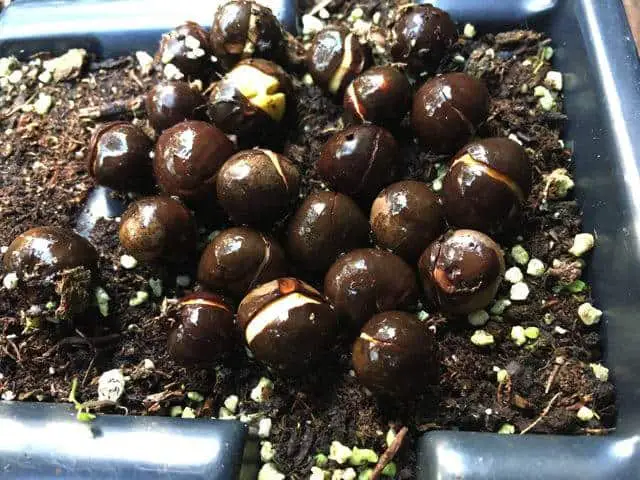
Be forewarned: It might take several weeks, perhaps even two months, for your seeds to show any cracks.
If no cracks appear after the first ten days or so, repeat the soaking procedure described above. Even among those seeds that initially sank underwater, you will find a few that decide to become floaters on subsequent soaking. Separate out these floaters and return the seeds to the appropriate trays for further resting and watering.
Repeat the soaking step as needed.
Patience through this process is a must. Don’t lose it!
What to do with floater tea seeds?
You might get a few floater seeds that germinate and add to your total stock. But I wouldn’t invest a lot of time and energy into these low-quality seeds. Instead, fill a bin with peat and a little perlite, throw on the seeds and keep them hydrated as you would with the floaters. But don’t bother checking for cracked seeds very often; once a week should suffice.
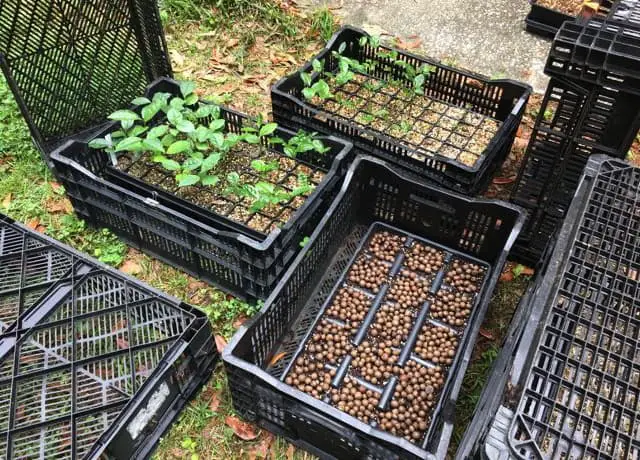
How to plant tea seed in starter trays
Accumulate enough cracked tea seeds to make the next step worth the trouble. The goal in this part of the process is to encourage the root system to develop sufficiently to survive up-potting or planting in the field. My system described below is a cost-effective way to achieve this goal.
There are three components: cracked seeds, propagation trays, and potting medium.
Here is what I do to grow the strongest tea seedlings possible.
Propagation trays for tea seeds
Camellia sinensis has a baby taproot that will shoot past the seed coat like a ground-penetrating rocket. Your containers for starting tea seed must, therefore, accommodate a long, ponderous taproot. The fine, laterally projecting roots, in contrast, will develop much more slowly and don’t need to be accommodated early on.
I prefer to use propagation trays with cells that are at least five inches (127 mm) deep and two inches (51 mm) square. Trays of 50 cells total, supported by a webbed 1020 flat, are a very efficient use of space and materials.
If you have trays or other containers deeper than five inches, but not too much wider than three inches, then use them. Tea will appreciate the extra legroom but additional width is not as valuable for root growth.
And remember that not all your seeds will germinate or be worthy of any more than the minimum of materials required to pass through the early stages of seedling growth. Under these circumstances, the 50-cell flat is probably the most economical option available.
Growth medium recipe for tea seeds
A commercial potting media works well for seeds but always check for moisture retention. As with the uncracked tea seeds, you don’t want your potted seeds to rot. To improve the passage of water, add more perlite and small-sized, pine bark mulch (also called pine bark fines).
If you’re the DIY type and want to mix up your own medium, here’s what I mix up to provide a spatially complex, well-drained medium. And for seedling nutrition, I include a little bit of compost, nutrients, and minerals.
To make a planting medium for tea seeds, combine and thoroughly mix together the following ingredients:
Adjust the quantities of fertilizer and mineral sources so that they are available in trace amounts. For example, I add to every 9 gallons (30 liters) of the materials mixture, 1 cup (128 grams) each of fertilizer and minerals.
By the way, a five-gallon bucket filled above the rim is about six gallons of material. In this recipe, I fill the bucket above the rim with pine bark fines.
Use worm castings (i.e., vermicompost) for seed nutrition but only if the texture of castings is light and crumbly. Drainage of the potting medium can be very poor if castings are sticky, dense, and retentive of water. Substitute sifted compost for castings if you can’t find the latter with the proper texture.
And if you’re really short on funds, I have heard from growers of ornamental camellias that you can get by with just bark fines and perlite in a 1-to-1 ratio and nothing else. That sounds pretty lean to me but try it and report back, please.
Check drainage of your tea seed medium
Whatever mixture you choose, test a small test sample for drainage.
If you find that a near-saturated handful of medium binds together into a dense or muddy clump, then it’s not loose enough. A well-structured medium should fall apart fairly easily after you open up your hand to release the mixture.
And as a general rule, always err towards efficient drainage even if you have to cut back a bit on nutrient inputs. Add more pine bark fines or perlite to loosen up the medium and then retest.
When your test sample of the medium shows an acceptable texture you can then scale up the volume of your production. A cement mixer is very handy for mixing a lot of material together in a short amount of time. You may need it again later when you mix material for up-potting seedlings.
Planting tea seeds in propagation trays
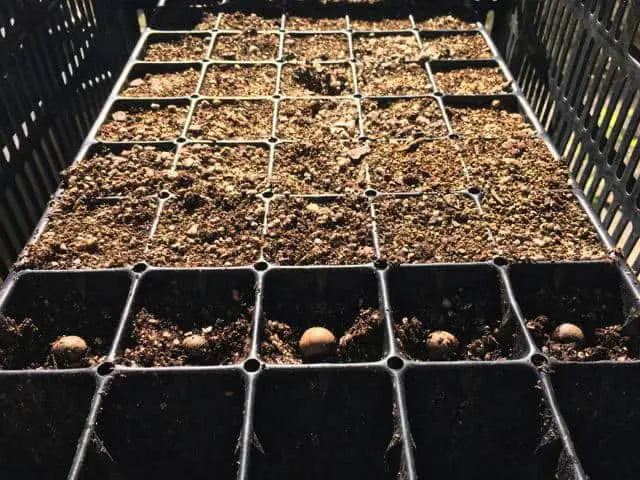
The final step is to plant cracked seeds in trays. This is straightforward except for one important trick. Pay attention.
Fill the cells of the propagation tray with your potting medium and give the tray a shake to settle the material. Leave the top inch of the cell unfilled.
Next, look closely at the cracked seed. You will notice that there is a light-colored eyespot on the seed coat. Most of the time, the crack will run through the eyespot. Position the seed so that the eyespot is parallel to the surface of the potting medium.
Proper positioning of the seed assures that embryonic stem and root do not have to grow out and around the seed coat in order to grow up and down, respectively. Young tissue that makes a partial loop around the seed coat may develop a permanent kink at the soil level that later on weakens a maturing plant.
Now, cover the seed with more potting medium, leaving about a quarter-inch of depth for coarse vermiculite as a topping.
Give the newly planted seeds a spray of water and then protect the tray from high heat and freezing cold. If it’s the cool season, you can arrange a greenhouse heating pad for gentle warmth underneath the tray.
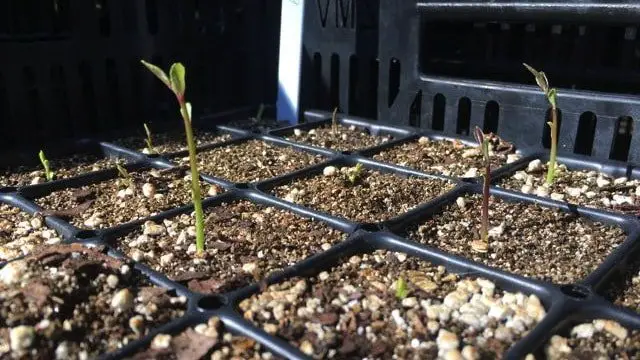
Water as needed to keep the soil damp but not soggy. Depending on ambient temperatures, you will have to wait between two weeks to a month for your seeds to sprout. Patience, my tea friend.
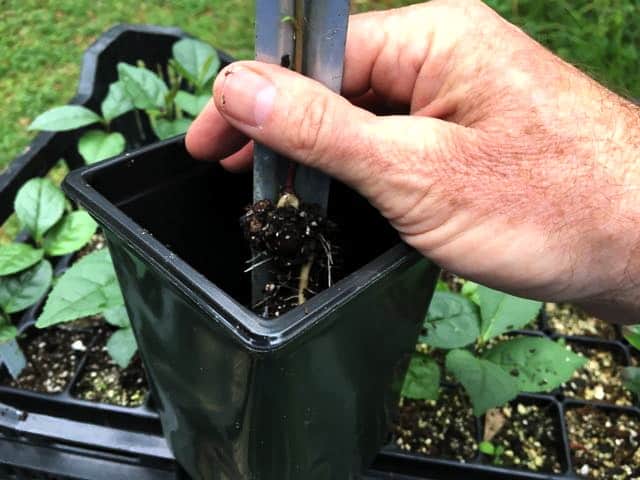
Transplant tea seedlings to pots or to the garden?
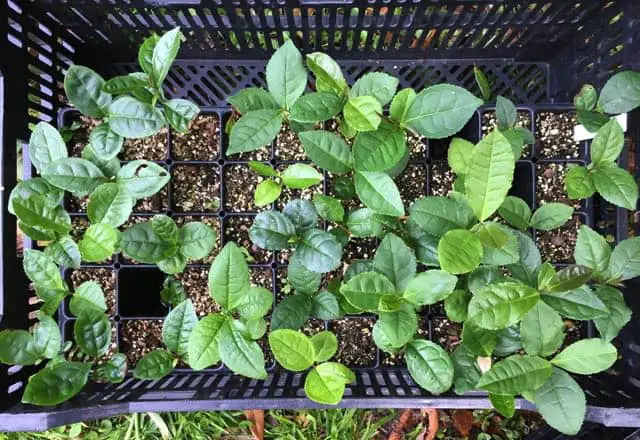
You’ve made it this far and now you have a bunch of sprouted tea seedlings. That’s awesome!
Once you see that the tea taproots have reached the bottom of the propagation cell, and the plant has four or five true leaves, then you have to decide where to transplant your seedlings. You have two options: Up-pot seedlings or directly transplant seedlings to the garden.
The good and the bad of up-potting tea seedlings
One advantage of up-potting is that your seedlings will have time to develop into a hardy plant before they are exposed to the stresses of the field. You will also have the opportunity to sort out the robust seedlings from the losers. When it comes time to install plants in the garden you will be fairly confident in the overall vigor of your stock.
The disadvantages of up-potting are the costs of materials and labor. In terms of materials, you will need deep plastic pots (again, depth is more important than width) and potting materials (well-drained and balanced for acid-loving plants here too).
Labor involves up-potting seedlings and then watering and monitoring pots over time so that they don’t freeze or burn up. It may then take up to ten months of managing your potted seedlings before you can put them out in the garden.
Direct transplanting of tea seedlings has risks
Directly transplanting seedlings from trays to your garden also has pros and cons. The main reason for direct transplanting is that all the costs of up-potting are avoided. If money for your tea project is tight, then direct transplanting will have a strong appeal.
But consider this delayed cost of direct transplanting: You must expect that many seedlings, even the robust ones, will fall prey to insects, rodents, deer, and microbial pathogens.
In addition, a cold snap or a long, hot dry spell can also be fatal to your seedlings.
To be sure, up-potted seedlings, once finally installed in the garden, will not be immune to such hazards. But after growing strong for many months in the relative safety of pots, they will be much less vulnerable than direct-transplanted seedlings.
Still, the direct transplant method is widely used throughout the tea-growing world. To make this method work, you can install sturdy shade-cloth structures over your seedlings to protect them from the intense sun.
And allow for field attrition of your seedlings by purchasing a few extra seeds for insurance. To be super-conservative, assume that conversion of seed to surviving plants in the field is just five, rather than fifteen, percent. And now, you’re being a realistic tea farmer.
Planting your tea seedlings in the garden
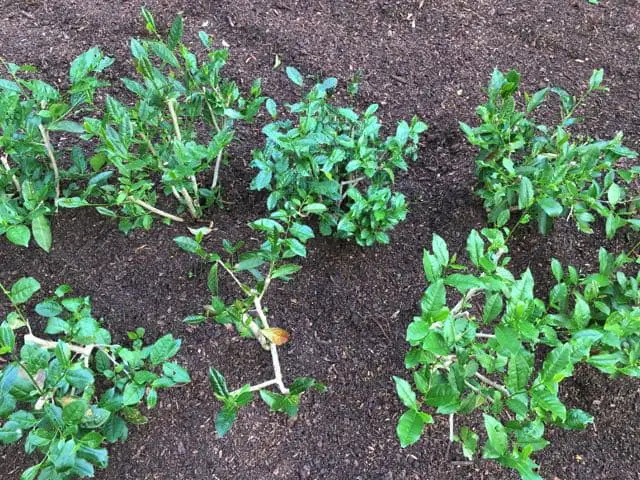
You can’t just stick young tea plants in the ground willy-nilly. You will need to decide on a configuration for your plantings and then prepare planting beds. I prefer planting tea in hedgerows at a fairly high density per square foot, but you may choose a different scheme.
In any case, it will take some contemplation on your part to get it right. As you wait for seeds to germinate and seedlings to grow, you will have plenty of time to plot your next move in the garden.
Black tea seeds, green tea seeds, oolong tea seeds: What’s the difference?
One widespread misconception is that different types of tea—black, green, oolong, white, and pu’erh teas—are each made from different types of tea plants.
The truth, however, is that the difference between teas arises primarily from how leaves are processed after harvest, and not from the plants that yielded the leaf. Therefore, you cannot grow different types of Camellia sinensis seeds in order to make a particular type of tea.
But here’s an important caveat. There are indeed different cultivated varieties of tea, and some are better for making, say, green tea than black tea. For example, one variety, Camellia sinensis var. assamica, is widely cultivated in warm tropical regions for its black and pu’erh teas and less for green tea.
Another tea cultivar, Camellia sinensis var. sinensis is grown in cooler regions and largely for its green tea.
The point here is to discourage you from choosing seeds based on the supposed potential of some cultivars to favor different types of tea. Instead, choose tea seed based on its suitability for your growing environment. And in nearly all of North America, the best choice is likely to be a descendant of the cold-hardy Camellia sinensis var. sinensis.
As you hone your skills as a tea gardener, you can branch out into other, more risky, tea cultivars.
How long does it take to grow tea from seed?
A timeline for getting your tea from the seed to, possibly, the cup is as follows:
- Year 1: Germination of seeds, up-potting or field planting of seedlings.
- Year 2: Care of vulnerable seedlings in pots or field; first prune to shape into a bush.
- Year 3: Maintenance and pruning; very light harvest of leaf in third summer; learn to make tea.
- Year 4: Moderate leaf harvest; continue your tea craft.
- Year 5 and beyond: Maximum leaf harvest, and making great tea!
Yes, it will take about four years of growth of the plants, as well as some learning of tea craft on your part, to get your first cup of delicious tea in the cup.
That may sound like a long time, but it’s worth it. I am now making black tea that’s better than anything I can buy in a store, and my green tea is not too shabby. And I know that my tea is clean and pesticide-free, which is not always the case for imported brands.
Exciting times for nascent tea growers
During your early forays into tea farming, keep in mind that the US tea industry is still green and has no shortage of doubters. This means that you will necessarily have to take a few chances here and there and maybe you won’t have all the support that you would like. But try to embrace the uncertainty. It’s all part of the excitement of getting in on the ground floor of a promising new opportunity!
Mike grows and crafts tea in North Florida, USA. He has advanced degrees in biology, and has undertaken coursework in manufacturing Camellia sinensis teas. Mike is a member of the US League of Tea Growers (USLTG) and has presented invited talks on tea growing. Send him a note through our Contact Page if you'd like to talk about tea.
Hi! A really good article, thank you! What would you say, what percentage of seeds are usually sinkers? You mentioned that 10-15% will sprout, but is that from the total amount or only from the sinkers?
Let me try again with your question, Kristiina. My first reply was incorrect. First, in my experience, the percentage of seeds that are sinkers is pretty low, 20% or less of all seeds.
As to your second question, what I tried to say was that only 10-15% will make a robust seedling, one that is ready for the field.
Third, of all sinkers, I think less than 50% will eventually germinate.
Your results may vary, but the bottom line is to plan for overall low conversion from seed to the field-ready seedling.
Hope this helps.
Mike
Thank you for this! Do you have any sellers you would recommend?
Great article! Such detail and really great info! I’m getting ready for my seeds now and this will really help me out. Cheers
Excellent article, very well written.
Your considerable time/effort/experience and advice valuable and appreciated
Do you think we will have any success growing bushes in coastal Maine?
Last frost date May 15?
Possibly. Check out my article The 5 Myths about Growing tea in the US.
https://leafhousetea.com/top-5-myths-about-growing-tea-in-the-us-debunked/
I am new to planting with seeds. The grower asked to soak the Camellia tea for 5-10 hours only. Luckily, I saw your article. I really enjoy reading it too. Thank you so much Mike. I follow your way. All the tea seeds I have are floaters. Bad sign! But I will plant them anyway to see if they can germinate.
Hi Ruth! Yes, try to get the seeds to crack before you give up on them. Maybe a couple will germinate.
Best of luck!
Mike
Hello Mike, Very educative articles, I will like know if I can grow tea plants in Nigeria ;{our vegetations; guinea/ Tropical climate}, with an average temperature of between 25°©-30°©. I will appreciate if you could be kind to give the details of cultivars and where to buy the Viable seeds from. Thank you.
Tea is grown in many parts of Africa. Just try an internet search and you’ll see!
I am wanting to grow tea plants potted indoors – but we’re in an excessively dry area. (Which is why I’d rather opt for indoors instead of outdoors; our soil is mostly clay, and at less than 5% average humidity, we’re technically a desert.) Is there any way to increase or control humidity for indoor growth?
Have you tried using a room humidifier?